
Making Sense of Change Data Capture Pipelines for Postgres with Debezium Kafka Connector
Should you need to get familiar with Kafka Connect Basics or Kafka JDBC Connector check out the previous post. This post focuses on PostgreSQL backup-replication mechanism and streaming data from database to Kafka with using Debezium connector.
There are basically 3 major methods to perform backups or replication in PostgreSQL:
- Logical dumps (Extracting SQL script that represents the data, for example with using pg_dump)
- Transactional Log Shipping (Using Write-Ahead Log)
- Logical Decoding
The first method is relatively harder to maintain and creates more load on the database. Log shipping and Logical Decoding is low level solutions that make use of transaction logs and have the major advantage of efficiency.
Understanding the Transactional Log
Transactional Log is the essential part of the modern relational database systems. It is basically history log of all actions and changes applied on the database. The database stores the data eventually in the filesystem, however this I/O operation is relatively costly and if any failure interrupts the writing process the file becomes inconsistent and it would not be easy to recover.
Therefore database writes the data to a log which is called Write-Ahead Log (WAL) directly and transaction is completed. When the data is logged in the WAL, it is considered to be successfully stored even though it is not written to file system yet. So even if system crashes or some failure arises, it will be read from the log when system restarts.
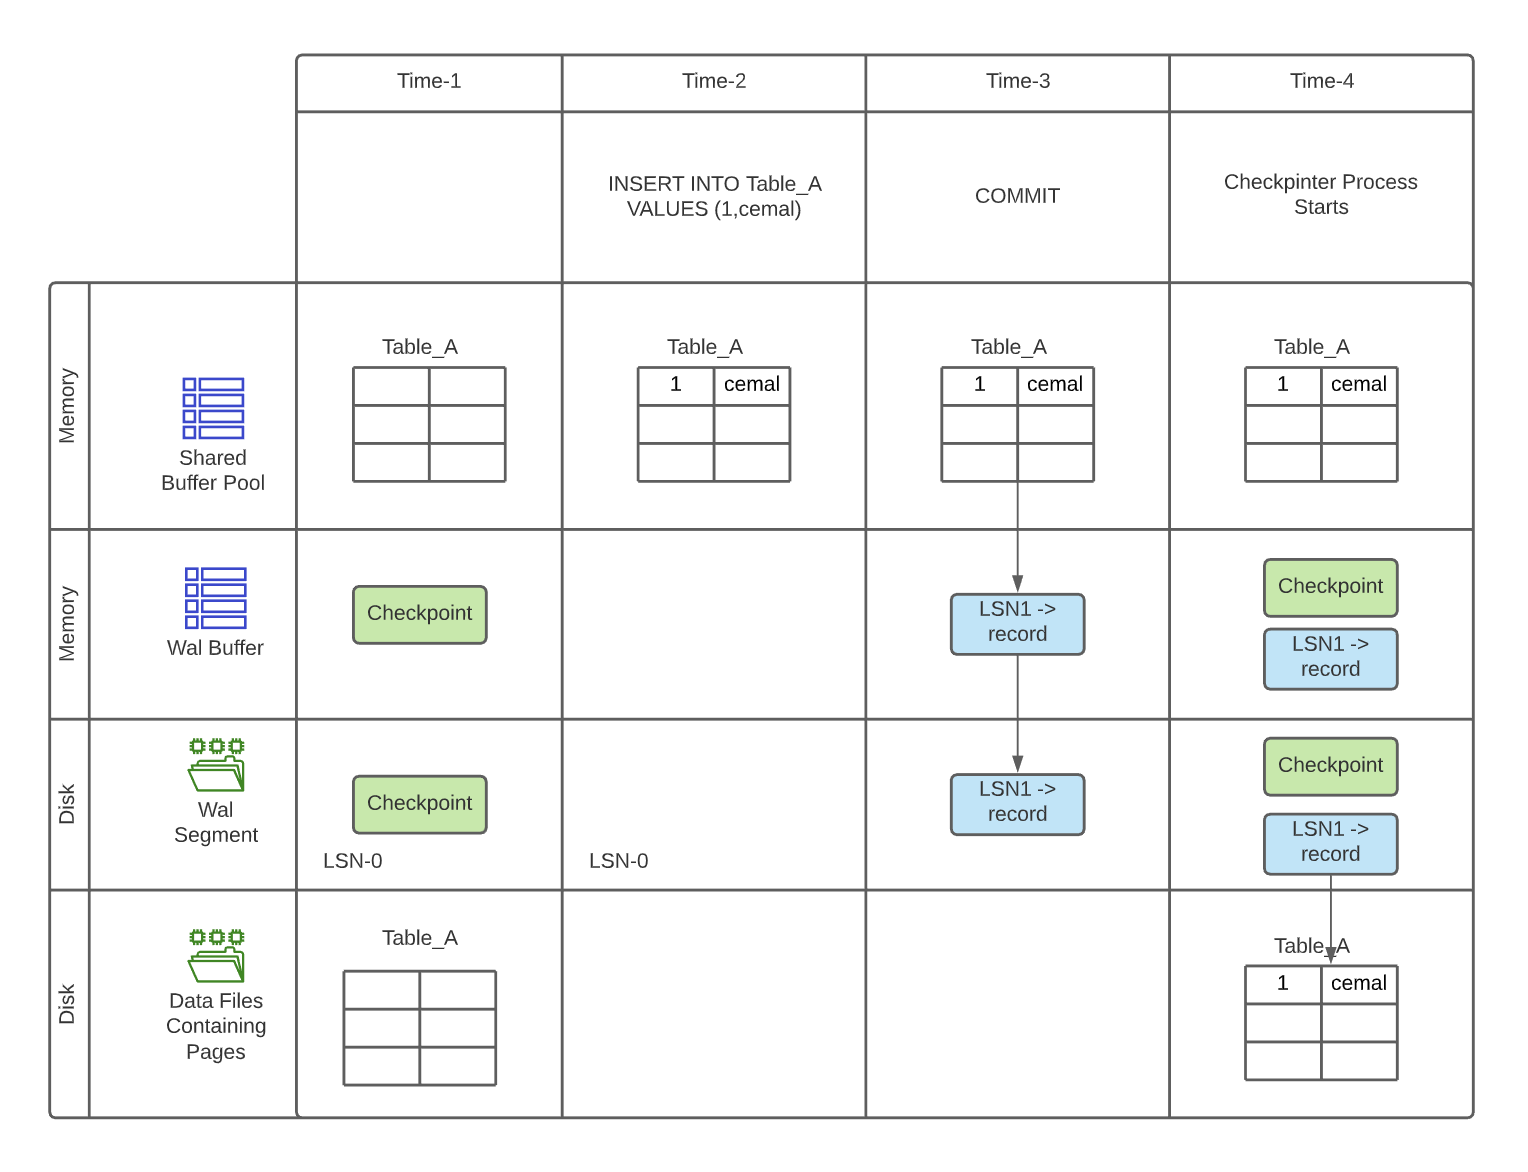
A process constantly reads the WAL, sets a checkpoint as point in time and writes the changes appended since the last checkpoint time to the actual database file system (every 5 mins by default). As the disk space is limited, the WAL files that are already processed are either archived or recycled (old ones are removed) in order to clean up disk space.
Each transaction log is divided into 16 MB file that is called WAL segment that consist of records. Each record has an identifier named Log Sequence Number (LSN) that shows the physical location of the record. Processing the transactions and checkpointing could be demonstrated as follows:
It's All About WAL!
The WAL has important role in replication as it contains the details about transactions, and these records are very important and useful in terms of representing the database state. Note that the WAL segments are not stored forever, once it is consumed it is removed from the disk. So one way to backup locally is copying segment files to a different directory (default dir: pg_wal). Sharing these records with remote servers gives the opportunity to create replicas efficiently.
Transactional Log Shipping
It is a solution to replicate the database in different servers by shipping the WAL segments. Replica server operates on recovery mode all the time and replays the WAL records that it receives to be consistent with primary server. This solution could be implemented by sending the complete 16MB WAL segments files or streaming individual records as they are written. Streaming is a better solution in terms of durability. See the details of psychical replication implementation details: Log Shipping.
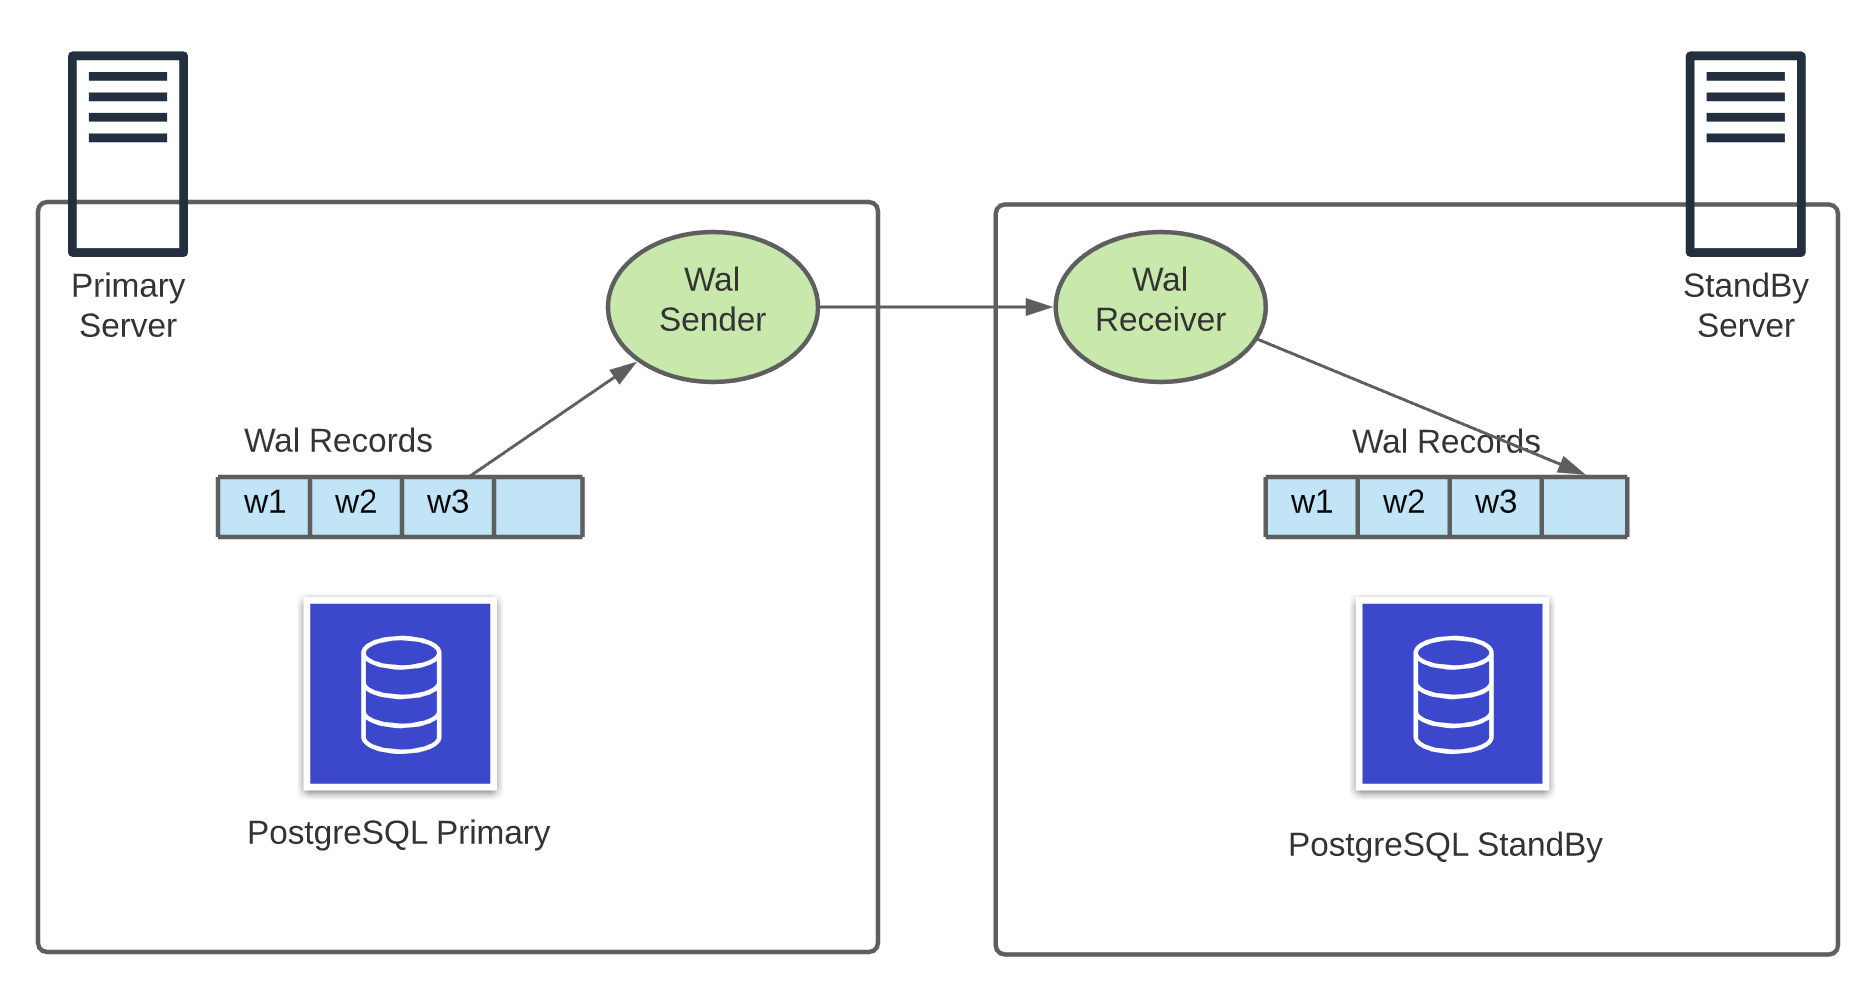
In Log Shipping method the segment files which contains binary data copied physically (byte-by-byte) to another server. So it can be also called physical replication. This approach has some limitations and drawbacks as it is not possible to replicate between different versions of Postgres or different operating systems, and also it can not replicate part of a database. Logical replication is introduced to address these limitations.
Logical Replication
Logical replication is a method that decodes the binary WAL records into a more understandable format and sends this decoded data to remote server. It uses publish and subscribe model with one or more subscribers receiving data from publishers. In contrast to physical replication, there is no Primary and Standby servers but data can flow both sides, but from publishers to subscribers. Publisher creates a PUBLICATION:
CREATE PUBLICATION mypublication FOR TABLE users, departments;
CREATE PUBLICATION alltables FOR ALL TABLES;
And Subscribers creates SUBSCRIPTION:
CREATE SUBSCRIPTION mysubcribtion
         CONNECTION 'host=localhost port=5432 user=foo dbname=foodb'
        PUBLICATION mypublication, alltables;
The changes send by publisher are replicated in the subscriber database to ensure that the two databases remain in sync. It is important to remember that after some time WAL segments are deleted. So if a subscriber stops for some and the the WAL record is deleted in the publisher it causes a FATAL error.
Replication slots solves this problem for us. By assigning a subscriber to a replication slot we can guarantee that the WAL records that it related with the subscription are not going to be removed until the subscriber consumes them. CREATE SUBSCRIPTION command automatically generates a replication slot in the publisher side for us so we do not need to create it manually.

Now having the necessary knowledge of PostgreSQL replication concepts we can proceed to configure and manage the Debezium Connector.
Debezium Connector
Debezium is an open source Change Data Capture platform that turns the existing database into event streams. Debezium Kafka Connector captures each row level change in the database and sends them to Kafka topics.
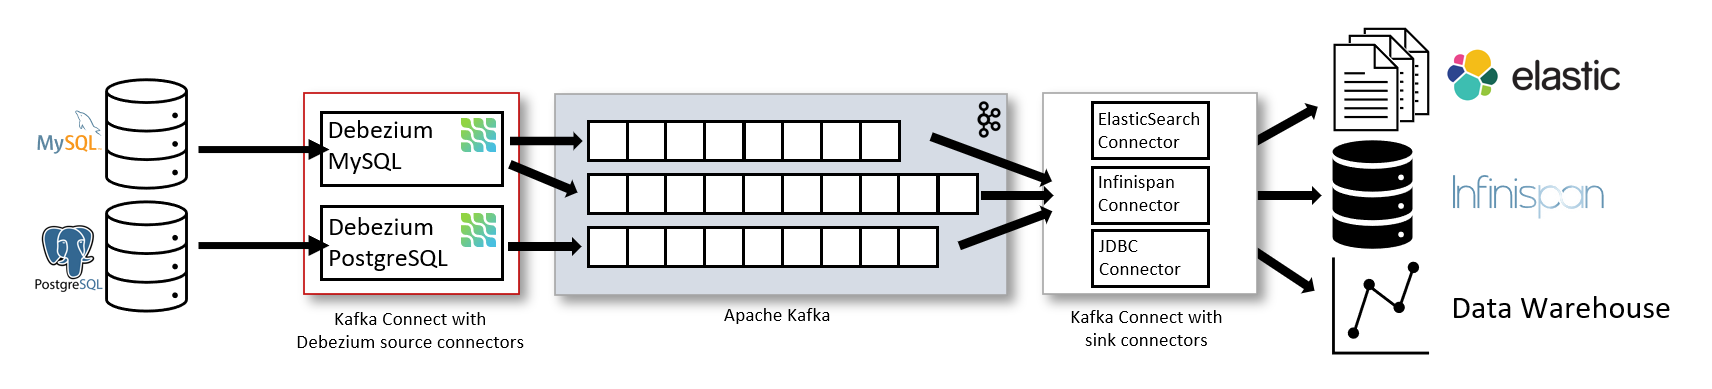
Debezium uses the logical replication feature of PostgreSQL in order to capture the transaction records from the WAL. The connector acts the subscriber role for the changes published from tables. It handles all the low level configuration for us, as creating publisher, subscribers replication slots etc.
In order to use the connector we need an output plugin installed in the PostgreSQL server so that it can decode the WAL records. Debezium connector supports number of output plugins:
decoderbufs: based on Protobuf and maintened by Debezium Communitywal2json: based on JSONpgoutput: is the standard logical decoding output plug-in in PostgreSQL, also supported by Debezium Community.
I personally recommend using pgoutput as it is the native plugin and it does not require any additional installation. If you would like to use another plugin you need to install it in the database server. See the documentation for installing plugins. We can setup the all architecture with the following steps
1-Running Kafka Cluster
We can use the following docker-compose file to get Kafka cluster with a single broker up and running.
version: '2'
services:
  zookeeper:
    image: confluentinc/cp-zookeeper:latest
    hostname: zookeeper
    container_name: zookeeper
    ports:
      - "2181:2181"
    environment:
      ZOOKEEPER_CLIENT_PORT: 2181
      ZOOKEEPER_TICK_TIME: 2000

  kafka:
    image: confluentinc/cp-kafka:latest
    hostname: kafka
    container_name: kafka
    depends_on:
      - zookeeper
    ports:
      - "9092:9092"
      - "29092:29092"
    environment:
      KAFKA_BROKER_ID: 1
      KAFKA_ZOOKEEPER_CONNECT: zookeeper:2181
      KAFKA_LISTENER_SECURITY_PROTOCOL_MAP: PLAINTEXT:PLAINTEXT,PLAINTEXT_HOST:PLAINTEXT
      KAFKA_ADVERTISED_LISTENERS: PLAINTEXT://kafka:9092,PLAINTEXT_HOST://localhost:29092
      KAFKA_OFFSETS_TOPIC_REPLICATION_FACTOR: 1

  control-center:
    image: confluentinc/cp-enterprise-control-center:5.5.1
    hostname: control-center
    container_name: control-center
    depends_on:
      - zookeeper
      - kafka
    ports:
      - "9021:9021"
    environment:
      CONTROL_CENTER_BOOTSTRAP_SERVERS: 'kafka:9092'
      CONTROL_CENTER_ZOOKEEPER_CONNECT: 'zookeeper:2181'
      CONTROL_CENTER_REPLICATION_FACTOR: 1
      CONTROL_CENTER_INTERNAL_TOPICS_PARTITIONS: 1
      CONTROL_CENTER_MONITORING_INTERCEPTOR_TOPIC_PARTITIONS: 1
      CONFLUENT_METRICS_TOPIC_REPLICATION: 1
      PORT: 9021

  postgresql:
    image: postgresql:12
    hostname: postgresql
    container_name: postgresql
    ports:
      - "5432:5432"
    environment:
      POSTGRES_DB: demo
      POSTGRES_USER: postgres
      POSTGRES_PASSWORD: root
Note that confluent center is optional and used only as the user interface for Kafka broker.
2- Preparing Debezium Connector Plugin
Download the Debezium PostgreSQL Connector plugin and extract the zip file to the Kafka Connect's plugins path. While we start Kafka Connector we can specify a plugin path that will be used to access the plugin libraries. For example plugin.path=/usr/local/share/kafka/plugins. Check Install Connector Manually documentation for details.
3- Running Kafka Connect
We can run the Kafka Connect with connect-distributed.sh script that is located inside the kafka bin directory. We need to provide a properties file while running this script for configuring the worker properties.
We can create create connect-distributed.properties file to specify the worker properties as follows:
# A list of host/port pairs to use for establishing the initial connection to the Kafka cluster.
bootstrap.servers=localhost:29092

# unique name for the cluster, used in forming the Connect cluster group. Note that this must not conflict with consumer group IDs
group.id=connect-cluster

# The converters specify the format of data in Kafka and how to translate it into Connect data.
key.converter=org.apache.kafka.connect.json.JsonConverter
value.converter=org.apache.kafka.connect.json.JsonConverter
key.converter.schemas.enable=true
value.converter.schemas.enable=true

# Topic to use for storing offsets. This topic should have many partitions and be replicated and compacted.
offset.storage.topic=connect-offsets
offset.storage.replication.factor=1

# Topic to use for storing connector and task configurations; note that this should be a single partition, highly replicated,
config.storage.topic=connect-configs
config.storage.replication.factor=1

# Topic to use for storing statuses. This topic can have multiple partitions and should be replicated and compacted.
status.storage.topic=connect-status
status.storage.replication.factor=1

# Flush much faster than normal, which is useful for testing/debugging
offset.flush.interval.ms=10000

plugin.path=/Users/cemalturkoglu/kafka/plugins
Note that the plugin.path is the path that we need to place the plugin library that we downloaded.
After running the connector we can confirm that connector's REST endpoint is accessible, and we can confirm that JDBC connector is in the plugin list by calling http://localhost:8083/connector-plugins
4- Preparing PostgreSQL Server for Logical Replication
The first thing we need to configure in PostgreSQL is wal_level that can be one of minimal, replica and logical. This configuration specifies how much information should be written to WAL, and the default value is replica, we need to set it as logical to be able to stream records with logical replication.
The default wal_level can be seen with SHOW wal_level; command
postgres=# SHOW wal_level;
 wal_level
-----------
 replica
(1 row)
This configuration is in the postgresql.conf file which is generally located at /var/lib/postgresql/data/pgdata/postgresql.conf. To find the config location you can use SHOW config_file; command. In the PosgreSQL server go to this location and edit the file:
~ docker exec -it 62ce968539a6 /bin/bash
root@db:/# nano /var/lib/postgresql/data/pgdata/postgresql.conf
Set the wal_level to logical and save it. This change requires restarting the postgreSQL server. This is the bare minimum connection required to run the connector.
Also optionally, you can create another user who is not a super user for security reasons. This user need to have LOGIN and REPLICATION roles.
CREATE ROLE name REPLICATION LOGIN;And this user should be added in pg_hba.conf file to have authentication. This config may have host all all line then it accepts all connections and there is no need add the new user.
5- Starting the Connector
We run the connectors by calling REST endpoints with the configuration JSON. We can specify the configuration payload from a file for curl command. The following command starts the connector.
curl -d @"debezium-config.json" \
-H "Content-Type: application/json" \
-X POST http://localhost:8083/connectors
The configuration for the plugin is stored in debezium-config.json file can be as follows:
{
  "name": "debezium-connector",
  "config": {
    "connector.class": "io.debezium.connector.postgresql.PostgresConnector",
    "database.hostname": "localhost",
    "database.port": "5432",
    "database.user": "postgres",
    "database.password": "root",
    "database.dbname" : "demo",
    "plugin.name": "pgoutput",
    "database.server.name": "demo-server"
  }
}- The connector connets to the database with the connection string.
- Reads the current position of the server's transaction log.
- It starts by performing an initial consistent snapshot of each of the database schemas. It sends messages with
READevent for each row encountered during the snapshot. - After snapshot is completed, it starts streaming changes as
CREATE,UPDATEandDELETEevents from the transaction log starting from the saved position. So if new records are added during the snapshot they will be captured from WAL and send to Kafka.
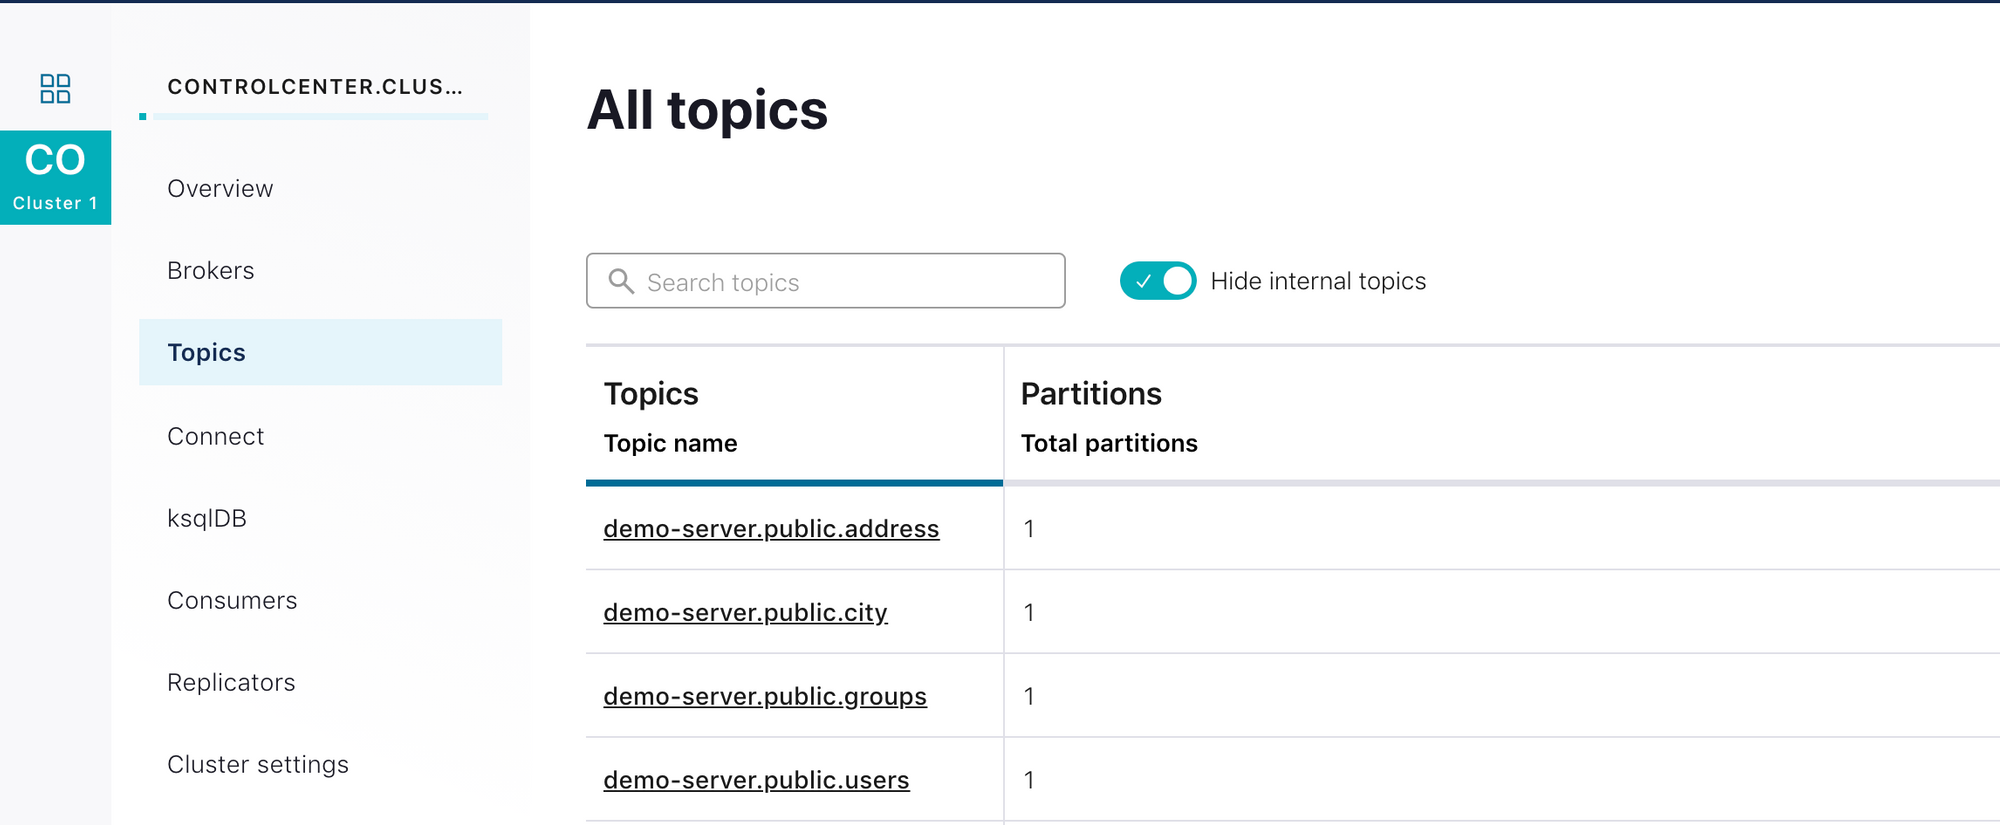
We can see that 4 tables from my demo database are shipped to Kafka topics. Topic names are generated as: <server-name>.<schema-name>.<table-name>
And each row in the tables are loaded as a message:
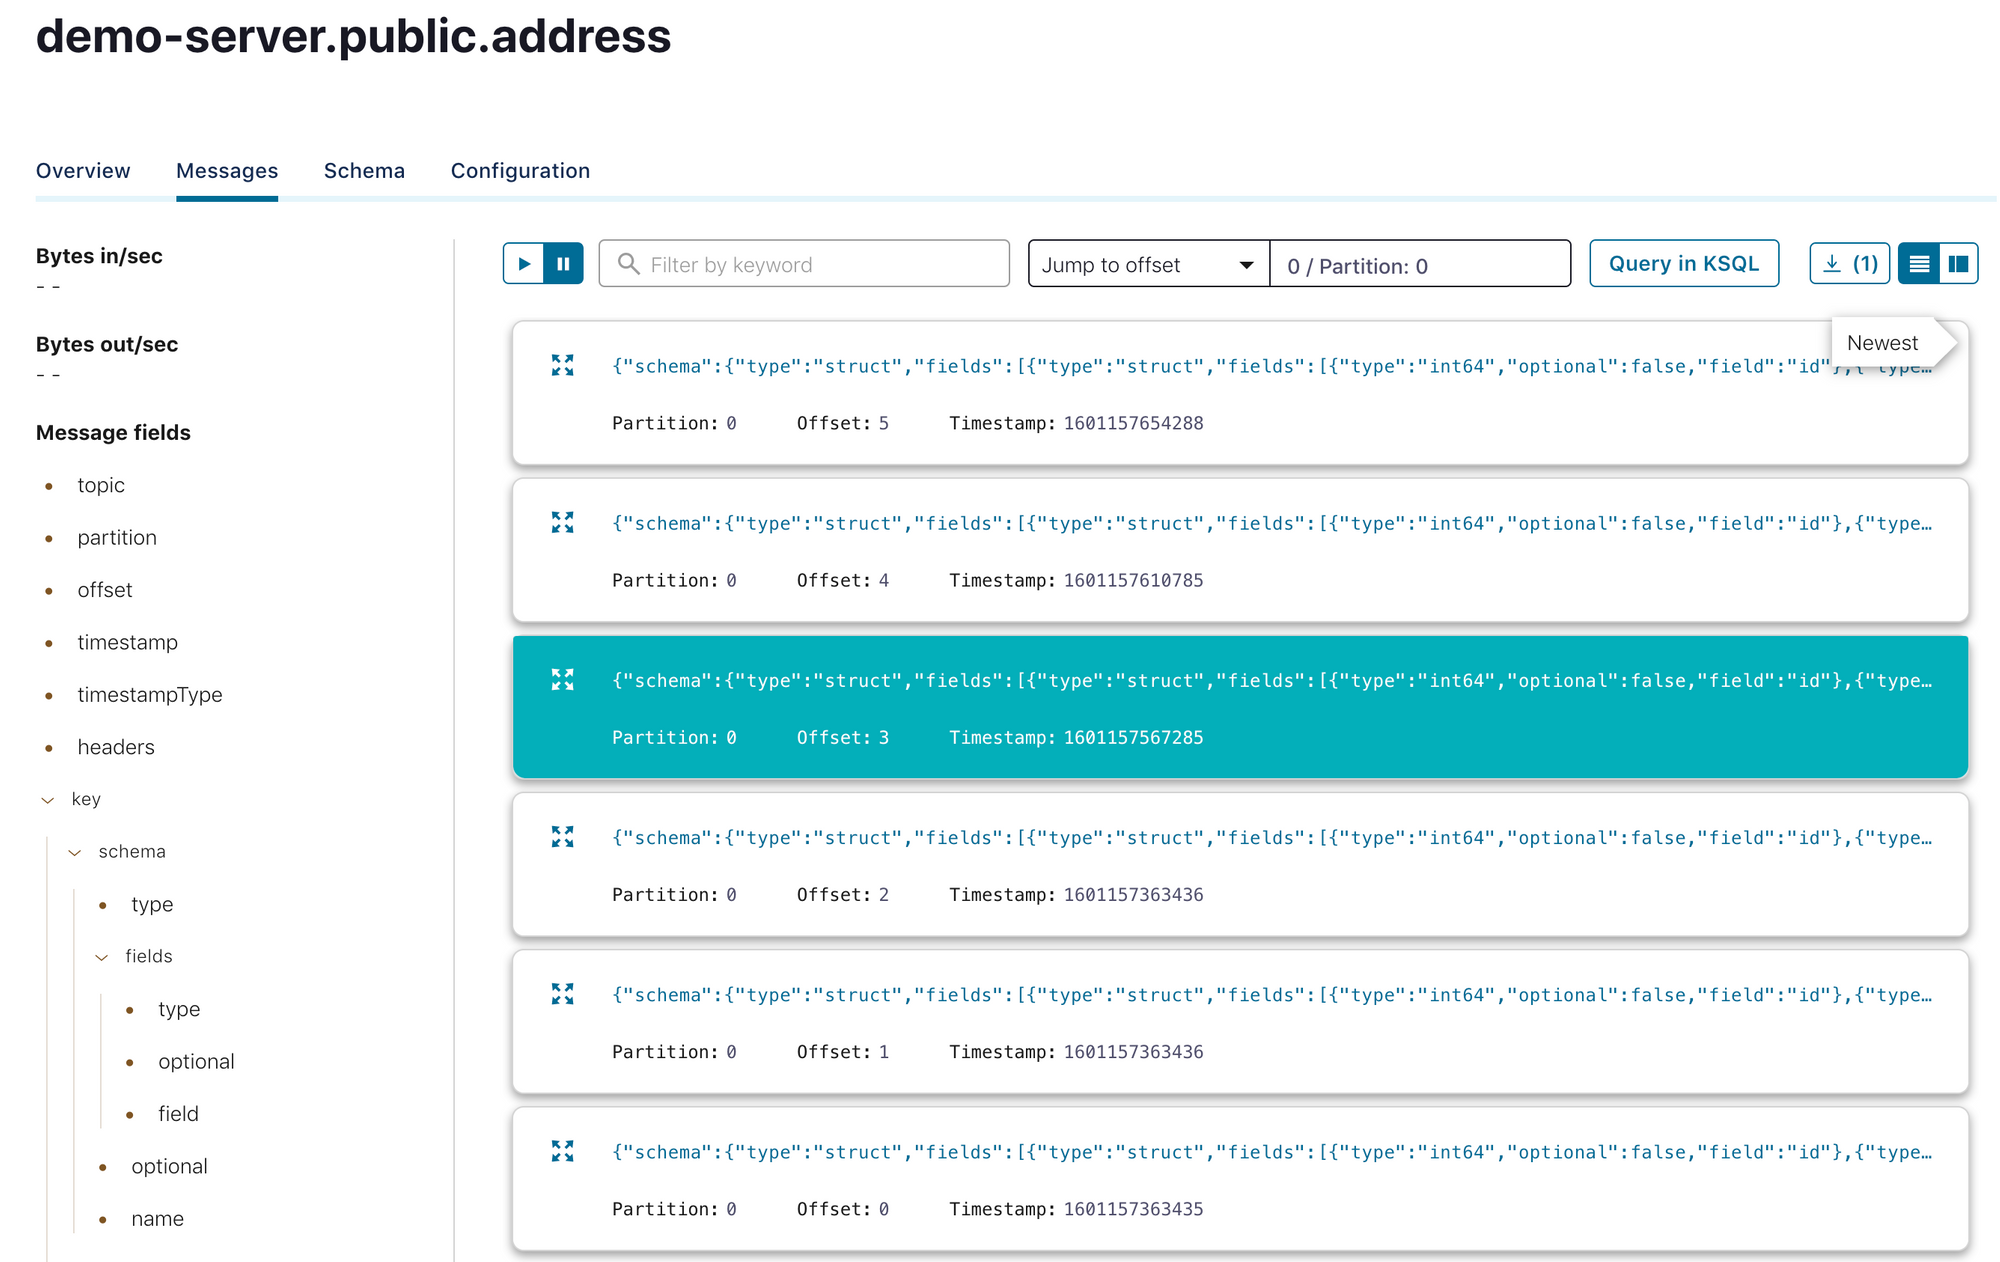
Each message contains schema and payload fields. Payload has the before and after fields specifying the object that is being changed. The payload also contains op field which stands for the operation and maps as follows:
c: creater: readu: updated: delete
{
  "schema": {
    "type": "struct",
    "fields": [
      {
        "type": "struct",
        "fields": [
          {
            "type": "int64",
            "optional": false,
            "field": "id"
          },
          // ...
        ],
        "optional": true,
        "name": "demo_server.public.address.Value",
        "field": "after"
      },
    ],
    "optional": false,
    "name": "demo_server.public.address.Envelope"
  },
  "payload": {
    "before": null,
    "after": {
      "id": 5,
      "flat": "flat-1",
      "postal_code": "ABC",
      "street": "street",
      "title": "new address",
      "city_id": 7,
      "user_id": 2
    },
    "source": {
      "version": "1.2.5.Final",
      "connector": "postgresql",
      "name": "demo-server",
      "ts_ms": 1601157566900,
      "snapshot": "false",
      "db": "demo",
      "schema": "public",
      "table": "address",
      "txId": 848,
      "lsn": 24940072,
      "xmin": null
    },
    "op": "c",
    "ts_ms": 1601157567132,
    "transaction": null
  }
}
In this example payload.op is c and the payload.before field is null as this is a create operation.
Filtering Schema and Tables
schema.whitelistschema.blacklisttable.whitelisttable.blacklistconfiguration properties can be used to choose the tables to be subscribed to. Table list should be comma separated list of<schema-name>.<table-name>format.column.whitelistandcolumn.blacklistconfiguration properties can be used to choose the subset of columns.
Replica Identity
Replica Identity is a table level PostgreSQL setting that is used to determine the amount of the information to be written in the WAL for update events. In the UPDATE and DELETE events there is a payload.before field which contains the previous object and some of its details. For example in a delete event:
{
   "payload": {
      "before": {
         "id": 5,
         "flat": null,
         "postal_code": null,
         "street": null,
         "title": null,
         "city_id": null,
         "user_id": null
      },
      "after": null,
      "op": "d",
      "ts_ms": 1601157654097,
      "transaction": null
   }
}
after is null as it is removed, and before contains only primary key of the object. The details of this object depends on the REPLICA IDENTITY of the table. It has the following options:
DEFAULT: contains only primary keysFULL: contains all of the columnsNOTHING: contains no information
We can set this config at the source table with the following command:
ALTER TABLE table_name REPLICA IDENTITY FULL;After this change on address table if I update a column I get the following message with the payload containing full details of the before object:
{
   "payload": {
      "before": {
         "id": 4,
         "flat": "10/1",
         "postal_code": "KLM123",
         "street": "Street3",
         "title": "office address",
         "city_id": 8,
         "user_id": 3
      },
      "after": {
         "id": 4,
         "flat": "10/1",
         "postal_code": "KLM02",
         "street": "St 15",
         "title": "office alternative address",
         "city_id": 8,
         "user_id": 3
      },
      "op": "u",
      "ts_ms": 1601212592317,
      "transaction": null
   }
}
Final words
In the Kafka JDBC Connector post high level implementation of copying data from relational database to Kafka is discusses. JDBC connector uses SQL queries to retrieve data from database so it creates some load on the server. It is also not possible to retrieve DELETED rows in this solution.
Although it is easy to start and setup JDBC connectors, it has pitfalls. Transactional Log based Change Data Capture pipelines are better way to stream every single event from database to Kafka. CDC pipelines are more complex to set up at first than JDBC Connector, however as it directly interacts with the low level transaction log it is way more efficient. It does not generate load on the database.
One drawback of this approach is that it is not possible to get schema changes as events. If the schema changes in the source database, the destination client should be adjusted manually.
References
- https://debezium.io/
- https://www.postgresql.org/docs/13/high-availability.html
- Hans-Jurgen Schonig, Mastering PostgreSQL 12 Third Edition
- http://www.interdb.jp/pg/pgsql09.html
- How to Integrate Your Databases with Apache Kafka and CDC, by Robin Moffatt