
Painless REST interactions with React-Redux
Recently I have been refactoring a legacy React project and I got really tired of lines of, pages of Redux related code which repeats itself all the time. Wiring a new end-point to app is quite a bit of repetitive work. In order to make a dead simple call, you may have to write services, actions, types constants, reducer, wire it to the store and also wire your components to the store to retrieve the state.
I started to look for a framework that could help with reducing this boilerplate code and I found the Redux-toolkit. I know I am late to discover it but better late than never. It comes with creator methods to simplify common use cases like store setup, creating reducers, immutable update logic.
Basics of Redux Toolkit
Configure Store
configureStore method wraps the createStore method of redux with good defaults. It adds redux-thunk and Redux Dev Tools by default.
const store = configureStore({
  reducer: {
    itemReducer: itemReducer,
    customerReducer: itemReducer,
  },
});

export default store;
Create Action
Helps to get an action type string.
const actionCreator = createAction("item");Create Reducer
Replaces the switch case mechanism of reducers with a look up table of action types.
const counterReducer = createReducer(0, {
  increment: (state, action) => state + action.payload,
  decrement: (state, action) => state - action.payload
})
Create Slice
It is a very handy function to create reducers that can be used rather than the above method. It takes a name, an initial state and reducer functions and automatically creates actions, reducers and reducer types. For example:
const itemsSlice = createSlice({
    name: 'items',
    initialState: {
        items: [],
    },
    reducers: {
        createItem(state, action) { state.items.push(action.payload) },
        updateItem(state, action) {},
        deleteItem(state, action) {}
    }
});

const { reducer, actions, name } = itemSlice;

const { createItem, deleteItem, updateItem } = itemsSlice.actions;
dispatch(createItem({ id: 1, title: 'First Item' }));
createSlice returns reducer, actions and name objects. This reducer can be added to the combineReducers. So we get rid of switch case block and also creating constant action types as createSlice method is generating constant types for us with the given name string prefix.
Async Data Fetching
Asynchronous data fetching. logic can be defined inside the slices. For example if we have a usersAPI service which makes the REST calls:
const itemsSlice = createSlice({
    name: 'items',
    initialState: {
        items: [],
        loading: false,
        error: null,
    },
    reducers: {
        fetchItemsRequest: (state, action) => {
            state.loading = true;
        },
        fetchItemsSuccess: (state, action) => {
            state.loading = false;
            state.items = action.payload;
        },
        fetchItemsFailure: (state, actions) => {
            state.loading = false;
            state.error = actions.payload.message;
        }
    }
});

const {fetchItemsFailure, fetchItemsRequest, fetchItemsSuccess}  = itemsSlice.actions;

// thunk
const fetchUsers = () => async dispatch => {
    dispatch(fetchItemsRequest())
    const response = await usersAPI.fetchAll()
    dispatch(fetchItemsSuccess(response.data))
}
I think this is way better than how it was handled before.
Async Requests with createAsyncThunk
The second method to handle Asynchronous requests with Redux Toolkit is to use createAsyncThunk method which accepts an action type string and a function that returns a promise, and generates a thunk that dispatches pending/resolved/rejected action types based on that promise. It basically saves us from creating different action types for each status and dispatching the action in the correct order.
// First, create the thunk
const fetchItemById = createAsyncThunk(
    'items/fetchById',
    async (id) => {
        const response = await userAPI.fetchById(id)
        return response.data
    }
)

// Then, handle actions in your reducers:
const itemsSlice = createSlice({
    name: 'items',
    initialState: { items: [], loading: false },
    reducers: {
        // standard reducer logic, with auto-generated action types per reducer
    },
    extraReducers: {
        // Add reducers for additional action types here, and handle loading state as needed
        [fetchItemById.fulfilled]: (state, action) => {
            // Add user to the state array
            state.items.push(action.payload)
        }
    }
})

// Later, dispatch the thunk as needed in the app
dispatch(fetchItemById(1))
This helps a lot, code gets cleaner and Redux Toolkit handles generation of configurations and boilerplate code. But considering we have lots of different API resources to manage there is still some part of code gets being repeated. So I kept searching for other solutions and found the following modules trying to address this issue: redux-rails, redux-hooks
Redux-rails seems to be nice module, but while I was playing with Redux Toolkit to learn I tried to make generic actions and services, and it turned out that my generators cover all of my use cases in this project. So I decided to publish it.
So I have written my own easy to use module react-relaxful, in order to automate providing necessary and useful REST calls with creating the reducers, actions and services by using Redux Toolkit components under the hood. Here's the code:
How to use React-Relaxful
Start with adding the dependency:
yarn add @turkogluc/react-relaxfulCreate your resource:
const entityName = 'student';
const apiPath = 'students';
const host = 'https://5ee3417e8b27f3001609562a.mockapi.io/api';
export const studentEntity = createManagedResource(entityName, apiPath, host);
This solutions consists of creator methods. The main method to be used is createManagedResource. It takes 3 parameters:
- The
namerepresents the name of the entity and it is added as prefix to actions. - The
pathto make set endpoint root path - The
hostparameter is host used in REST call.
It creates actions, reducers, and API services for you, and returns these components. But you only need to register the reducer that it creates and after you are free to use the auto generated service methods for API calls.
export const studentEntity = createManagedResource(entityName, apiPath, host);

const { services, reducer, name, actions } = studentEntity;

const store = configureStore({
  reducer: {
    itemReducer: itemReducer,
    studentReducer: studentEntity.reducer,
  },
});

export default store;
Created service object has the following methods that can be dispatched anywhere:
const { services: studentService } = studentEntity;

// find by id
studentService.findById(1);

// find all
studentService.findAll();

// find all with query parameters
studentService.findAll({ name: 'user', surname: 'turkoglu' });

// create
studentService.create({id:1, name:'cemal'});

// update with the given id
studentService.update(1, {id:1, name:'kemal'});

// delete by given id
studentService.deleteById(1);
If you look at the store there are different statuses for each call type, so you can use all the loading, error or data states per each call:
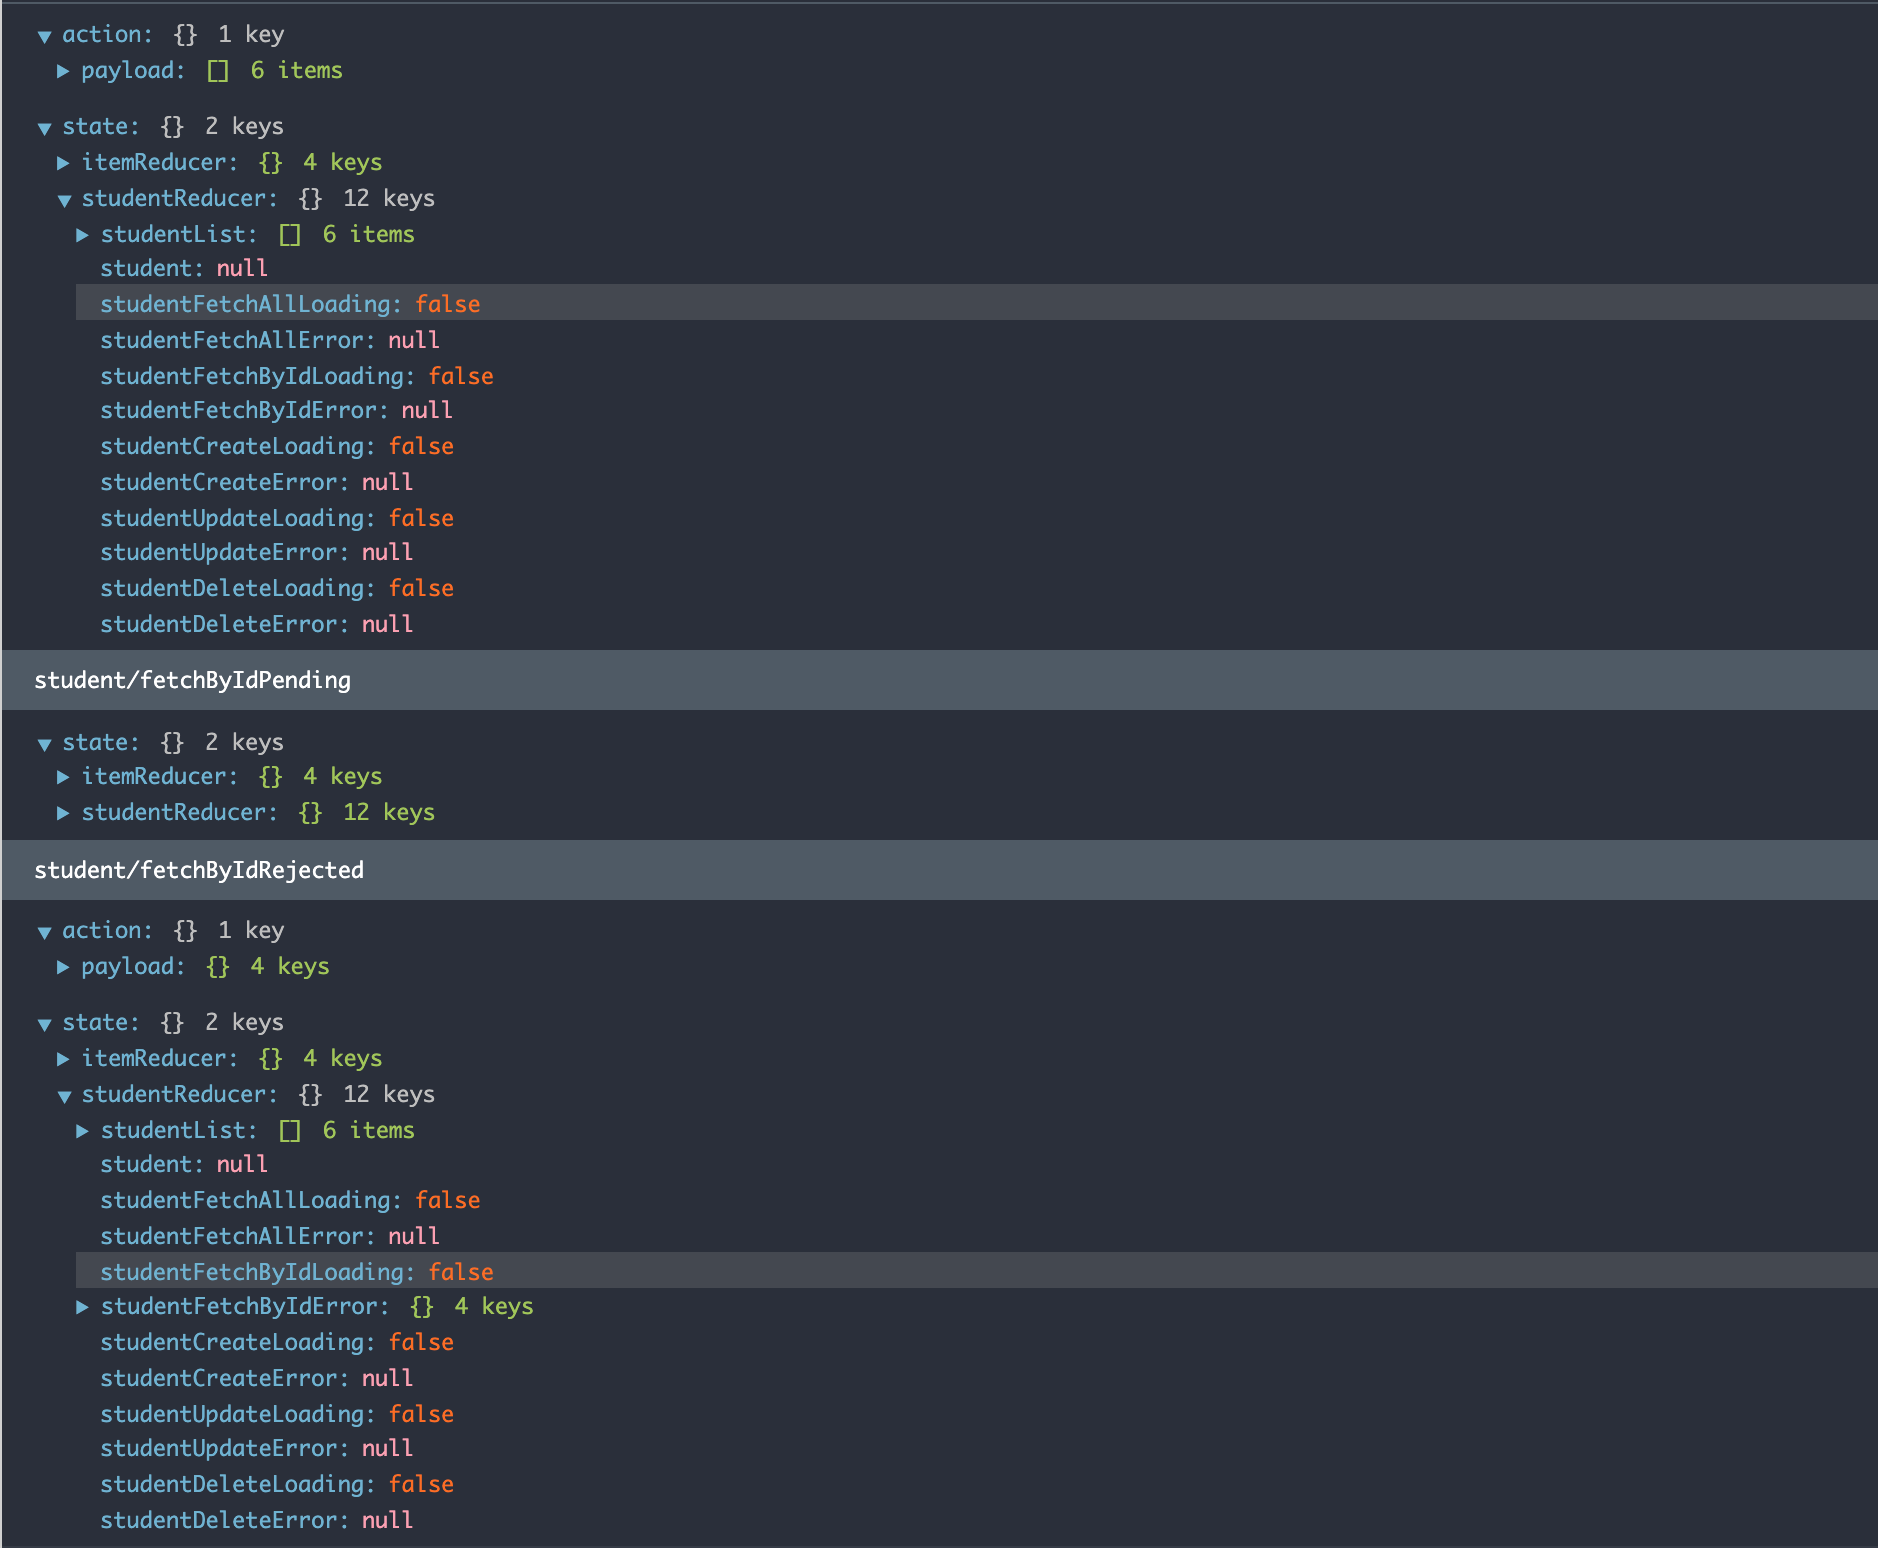
You can access the states as follows:
const studentList = useSelector(state => state.studentReducer.studentList);
const student = useSelector(state => state.studentReducer.student);

// loading and error states
const studentCreateLoading = useSelector(state => state.studentReducer.studentCreateLoading);
const studentCreateError = useSelector(state => state.studentReducer.studentCreateError);
Pull it: @turkogluc/react-relaxful