Database Based Multitenant Applications with Spring JPA
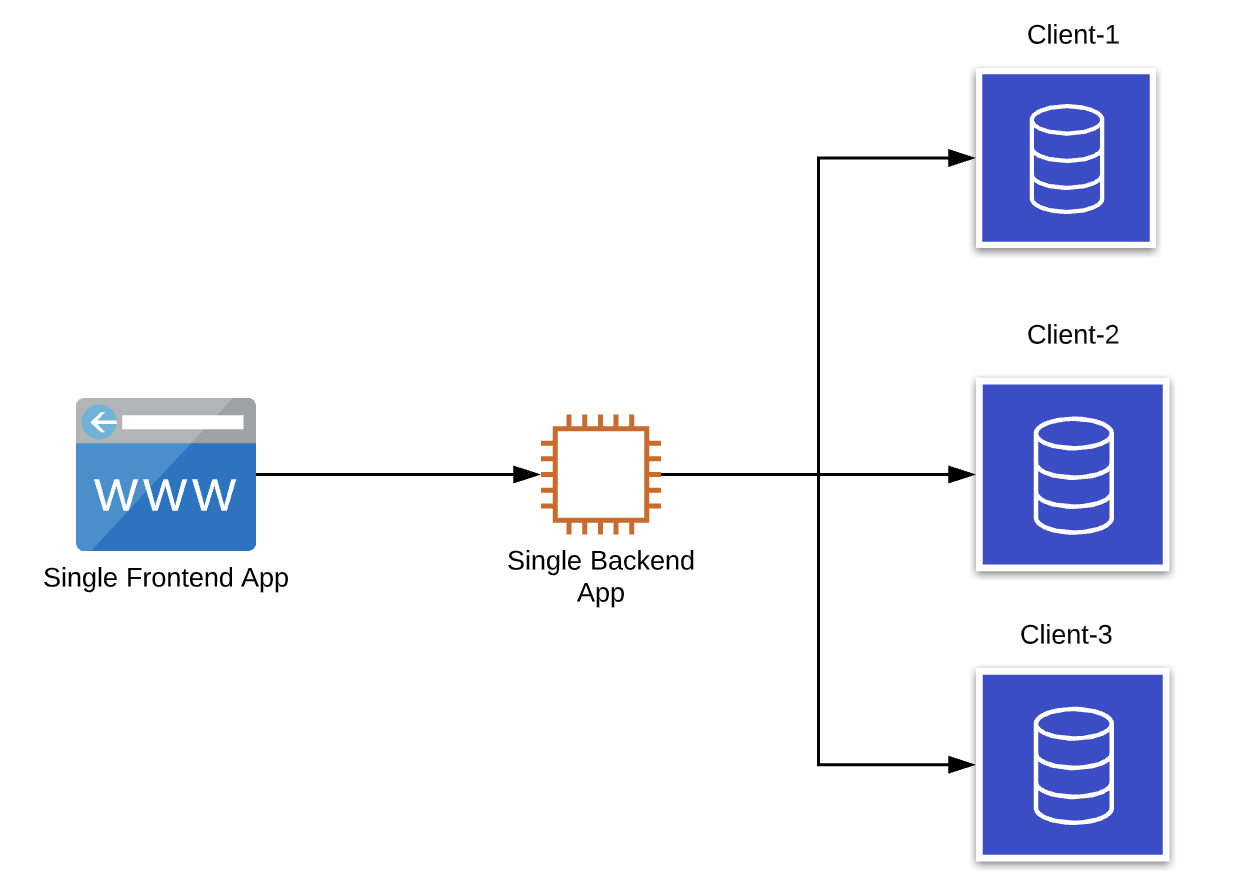
Imagine that you deployed your application which consists of a frontend, a backend, and a database and you are providing a service to a customer. Once you get new clients you should implement a distribution mechanism to give service to all of your clients but also provide isolation among clients such that each client uses the same application without seeing each other's data.
Multitenancy as a term refers to deploying a single instance of the application to a server and providing services to multiple clients. The following approaches are used for a multitenant application. We implement the database per tenant application in this post.
- Database per tenant
- Schema per tenant
- Tenant identifier column to every table
Provisioning a new client
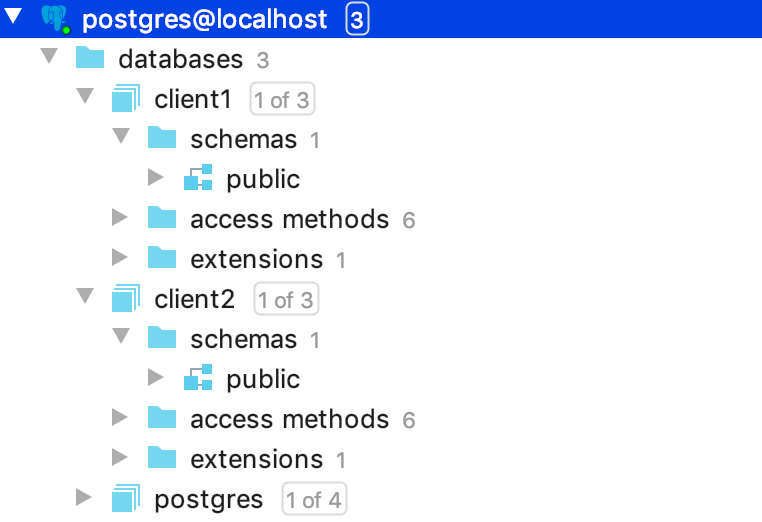
- A new database should be created for the new client. PostgreSQL creates the default schema
publicduring database creation, this schema will be used.
2. Database access details should be added to the Spring’s application.yml file.
tenants:
  datasources:
    client1:
      jdbcUrl: jdbc:postgresql://localhost:5432/client1
      username: postgres
      password: root

    client2:
      jdbcUrl: jdbc:postgresql://localhost:5432/client2
      username: postgres
password: rootUser Story
- A tenant identifier is needed per client to distinguish clients from each other. When a user logs in for the first time, the client sends the username, password , and tenant identifier. The Frontend can add the tenant identifier to the API call from the subdomain name. For example when a user logs in to
client1.service.comthe Frontend should add theclient1as the tenant identifier to the login call. - The Backend application handles the login request by checking credentials from the database of the given tenant.
- In a successful authentication, Backend creates the JWT token to be given to the Frontend and adds the tenant identifier to the JWT token as a claim.
- At the subsequent calls, the tenant identifier is retrieved from the JWT token and used to select the relevant database to be queried.
Implementation
In a Spring application following 2 approaches could be the possible ways to configure multitenant systems:
- Spring JPA configuration with AbstractRoutingDataSource
- Hibernate configuration with MultiTenantConnectionProvider
I decided to use AbstractRoutingDataSource as it is a neater and simpler way to configure.
So we need to configure the JPA to select the relevant datasource per each request according to the tenant who makes the request. Tenant Identifier can be retrieved from the JWT token but note that login operation is exceptional because there is no token assigned to the client yet. So the client should specify the tenantId in the login call.
1.Startup configuration
We should prevent the Spring to auto-configure the datasource at startup as there is supposed be no datasource selected at startup but rather it will be selected at runtime according to the tenant.
spring:
  jpa:
    open-in-view: false        # Get Rid of OIV Warning
    show-sql: true
    database: postgresql       # Do not Auto-Detect the Database
    hibernate:
      ddl-auto: none   		   # Prevent Hibernate from Automatic Changes to the DDL Schema
    properties:
      hibernate:
        dialect: org.hibernate.dialect.PostgreSQLDialect
  datasource:
initialization-mode: never # Prevent JPA from trying to Initialize2.Storing the tenant identifier
Tenant identifier will be retrieved from JWT token on each request and it will be assigned to ThreadLocal variable (as it will be accessible by the same thread during the request handling)
public class ThreadLocalStorage {

    private static ThreadLocal<String> tenant = new ThreadLocal<>();

    public static void setTenantName(String tenantName) {
        tenant.set(tenantName);
    }

    public static String getTenantName() {
        return tenant.get();
    }
}Please note that if you would like to share the ThreadLocal with the child thread, in case the service thread may create other threads while proceeding, you should use the InheritableThreadLocal. InheritableThreadLocal will pass the same variable to child threads and they will be aware of the tenant datasource.
3. Implementing the datasource routing
Datasource selection is made at runtime based on the tenant identifier. This selection is made by AbstractRoutingDataSource. It is configured as follows
public class TenantAwareRoutingDataSource extends AbstractRoutingDataSource {

    @Override
    protected Object determineCurrentLookupKey() {
        return ThreadLocalStorage.getTenantName();
    }
}4. DataSource Configuration
Datasource properties are retrieved by the following class from the application.yml
@Component
@ConfigurationProperties(prefix = "tenants")
public class DataSourceProperties {

    private Map <Object, Object> datasources = new LinkedHashMap <>();

    public Map<Object, Object> getDatasources() {
        return datasources;
    }

    public void setDatasources(Map<String, Map<String, String>> datasources) {
        datasources
                .forEach((key, value) -> this.datasources.put(key, convert(value)));
    }

    private DataSource convert(Map <String, String> source) {
        return DataSourceBuilder.create()
                .url(source.get("jdbcUrl"))
                .driverClassName(source.get("driverClassName"))
                .username(source.get("username"))
                .password(source.get("password"))
                .build();
    }
}Datasource configuration is implemented as follows:
@Configuration
public class DataSourceConfig {

    private final DataSourceProperties dataSourceProperties;

    public DataSourceConfig(DataSourceProperties dataSourceProperties) {
        this.dataSourceProperties = dataSourceProperties;
    }

    @Bean
    public DataSource getDataSource() {
        TenantAwareRoutingDataSource tenantAwareRoutingDataSource = new TenantAwareRoutingDataSource();
        tenantAwareRoutingDataSource.setTargetDataSources(dataSourceProperties.getDatasources());
        tenantAwareRoutingDataSource.afterPropertiesSet();
        return tenantAwareRoutingDataSource;
    }
}So an AbstractRoutingDataSource will be used at runtime as the datasource.
5. Extracting the tenant identifier from the request
A spring security filter is created to extract the tenant id from each request:
public class TenantIdentificationFilter extends OncePerRequestFilter {

    private static final Logger logger = LoggerFactory.getLogger(TenantIdentificationFilter.class);

    @Override
    protected boolean shouldNotFilter(HttpServletRequest request) {
        return request.getRequestURI().startsWith("/login");
    }

    @Override
    protected void doFilterInternal(HttpServletRequest request, HttpServletResponse response, FilterChain filterChain)
            throws ServletException, IOException {

        String token = request.getHeader(HEADER_STRING);
        if (token != null) {
            // parse the token.
            String tenant = JWT.require(Algorithm.HMAC256(SECRET.getBytes()))
                    .build()
                    .verify(token.replace(TOKEN_PREFIX, ""))
                    .getClaim("tenant").asString();

            // set the tenant identifier
            ThreadLocalStorage.setTenantName(tenant);
            logger.debug("Tenant found in the request: {}", tenant);
        }

        filterChain.doFilter(request, response);
    }
}Note that this filter is not applied to /login request as there is no JWT token assigned to the client before a successful login. This filter is added to the WebSecurityConfigurerAdapter as follows:
@EnableWebSecurity
public class WebSecurity extends WebSecurityConfigurerAdapter {

    @Override
    protected void configure(HttpSecurity http) throws Exception {
        http.cors().and().
                csrf().disable().authorizeRequests()
                .antMatchers(HttpMethod.POST, SIGN_UP_URL).permitAll()
                .anyRequest().authenticated()
                .and()
                // add tenant filter
                .addFilterBefore(new TenantIdentificationFilter(), UsernamePasswordAuthenticationFilter.class)
                .addFilter(new JWTAuthenticationFilter(authenticationManager()))
                .addFilter(new JWTAuthorizationFilter(authenticationManager()))
                .sessionManagement().sessionCreationPolicy(SessionCreationPolicy.STATELESS);
    }

    // ...
}Note that TenantIdentificationFilter is added before the authentication and authorization filters. Because before the authentication filter queries the database to check the user credentials, relevant datasource should be selected.
6. Login Operation
The previous step adds the extracting the tenant from JWT and storing it in ThreadLocal. In case the user does not have a session, there will not be a JWT token assigned to request. So that's why this filter is not applied to login call. But we still need to select the datasource before checking user authentication.
In order to handle login calls we should implement the following steps:
6.1. Selecting datasource to check the user credentials
The client application should send the Username, Password, and TenantId. At the Frontend call, we can add the TenantId according to the subdomain name (client-name.domain.com)
In the attemptAuthentication method of the UsernamePasswordAuthenticationFilter we should populate the ThreadLocalStorage with the received tenantId as follows:
ThreadLocalStorage.setTenantName(user.getTenant());6.2. Add the tenant id to the issued token
In the successfulAuthentication method of the UsernamePasswordAuthenticationFilter, the tenant identifier is added to the token as follows:
JWT.create().withClaim("tenant",ThreadLocalStorage.getTenantName())So after the steps 6.1 and 6.2, final UsernamePasswordAuthenticationFilter is as follows:
public class JWTAuthenticationFilter extends UsernamePasswordAuthenticationFilter {
    private AuthenticationManager authenticationManager;

    public JWTAuthenticationFilter(AuthenticationManager authenticationManager) {
        this.authenticationManager = authenticationManager;
    }

    @Override
    public Authentication attemptAuthentication(HttpServletRequest req,
                                                HttpServletResponse res) throws AuthenticationException {
        try {
            ApplicationUser user = new ObjectMapper()
                    .readValue(req.getInputStream(), ApplicationUser.class);
			// set tenant name
            ThreadLocalStorage.setTenantName(user.getTenant());
            return authenticationManager.authenticate(
                    new UsernamePasswordAuthenticationToken(
                            user.getUsername(),
                            user.getPassword(),
                            new ArrayList <>())
            );
        } catch (IOException e) {
            throw new RuntimeException(e);
        }
    }

    @Override
    protected void successfulAuthentication(HttpServletRequest req,
                                            HttpServletResponse res,
                                            FilterChain chain,
                                            Authentication auth) throws IOException, ServletException {
		// add tenant claim to the token
        try {
            String token = JWT.create()
                    .withSubject(((User) auth.getPrincipal()).getUsername())
                    .withClaim("tenant", ThreadLocalStorage.getTenantName())
                    .withExpiresAt(new Date(System.currentTimeMillis() + EXPIRATION_TIME))
                    .sign(HMAC256(SECRET.getBytes()));
            res.addHeader(HEADER_STRING, TOKEN_PREFIX + token);
        } catch (JWTDecodeException ex) {
            logger.error("Token could not be parsed");
        }
    }
}So we are done configuring multitancy. Now our spring application will start with an AbstractRoutingDataSource. List of datasources for customers will be provided from application.yml. JPA will select the database to query at run time based on the tenant identifier. The tenant identifier will be retrieved from JWT Token. If a user without session tries to log in, the Frontend should specify the tenant identifier to check username and password from relevant datasource.
Schema Migration
Having a single data source, JPA is able to track the schema changes based on the @Entity classes. With the following configuration any column, type, reference, etc changes of the entity are reflected in the related table.
spring:
  jpa:
    hibernate:
ddl-auto: updateHowever, with multiple data sources, this is not an option. Because JPA does this operation at the startup and in the case of having multiple data sources there is no selected data source when the application starts. So we set this configuration as never to not let the JPA try to reflect the DDL changes.
So we need to keep consistency for each customer database. Handling it manually is not very wise option. If we change columns of a table we need to go and update databases of all customers. It is also error-prone.
As a result, Flyway comes into play as the schema migration tool to keep track of the changes in the schema and reflect all data sources. It is pretty easy to configure and use.
If you would like to get an overview of the configuration please see Spring Database Migration with Flyway
Cache Collision Problem
As it is mentioned at the beginning there are 2 ways to configure multitenancy in a Spring application, and in this post, we are experimenting with the former solution which is Spring JPA configuration with AbstractRoutingDataSource. This solution works like a charm until we start using 2nd level caching for entities (@Cacheable).
In this solution, hibernate in fact, is not aware of multi-tenancy, but data source connection is provided by JPA. As a result, collusion occurs in the cache as the same cache will be populated from different databases with the same key. So if caching is used in the project, then either the second approach should be chosen or handling key generation for caching is needed.
So to solve this we can implement a custom key generator and let the cache manager use it.
public class CustomKeyGenerator extends SimpleKeyGenerator {

    @Override
    public Object generate(Object target, Method method, Object... params) {

        return ThreadLocalStorage.getTenantName() + "_" + generateKey(params);
    }
}It uses the same key generation as before but with the addition of <tenantName>_ prefix. So every key will have tenant identifier prefix and it prevents having collision on the caches for different databases.