
Build and Deploy Gradle Projects with Jenkins
Installation
In order to install Jenkins on your host machine, follow the instructions listed in Installing Jenkins page. Second and easier way to start with experiencing Jenkins is running it on docker:
docker run --rm -d -p 8080:8080 -p 50000:50000 -v jenkins_home:/var/jenkins_home jenkins/jenkinsMostly, docker daemon is needed to be used in the pipelines for building, running, publishing docker images. If you install the Jenkins on the host machine, follow the instructions in Installing Docker page to get docker up and running as well.
However if you are running the Jenkins on docker, then we can mount the docker socket running on host machine to Jenkins running on docker, so that container will use the docker daemon of the host machine. [1]
docker run --rm -d -p 8080:8080 -p 50000:50000 -v jenkins_home:/var/jenkins_home -v /var/run/docker.sock:/var/run/docker.sock jenkins/jenkinsWithin the Jenkins container we still need to install the docker binaries so that container can talk to mounted docker daemon. So open a shell for jenkins container:
docker exec -it -u root <container> /bin/bashInstall docker:
apt-get update && \
apt-get -y install apt-transport-https \
     ca-certificates \
     curl \
     gnupg2 \
     software-properties-common && \
curl -fsSL https://download.docker.com/linux/$(. /etc/os-release; echo "$ID")/gpg > /tmp/dkey; apt-key add /tmp/dkey && \
add-apt-repository \
   "deb [arch=amd64] https://download.docker.com/linux/$(. /etc/os-release; echo "$ID") \
   $(lsb_release -cs) \
   stable" && \
apt-get update && \
apt-get -y install docker-ce
Add jenkins user to docker group and update the ownership of file docker.sock, otherwise docker command will get permission denied for jenkins user.
sudo usermod -aG docker jenkins
sudo chown root:docker /var/run/docker.sock
Configuration
Now we can access the Jenkins user interface on http://localhost:8080/ address. It is going to ask us to fill a security password that is generated during start up to unsure it is securely set up.
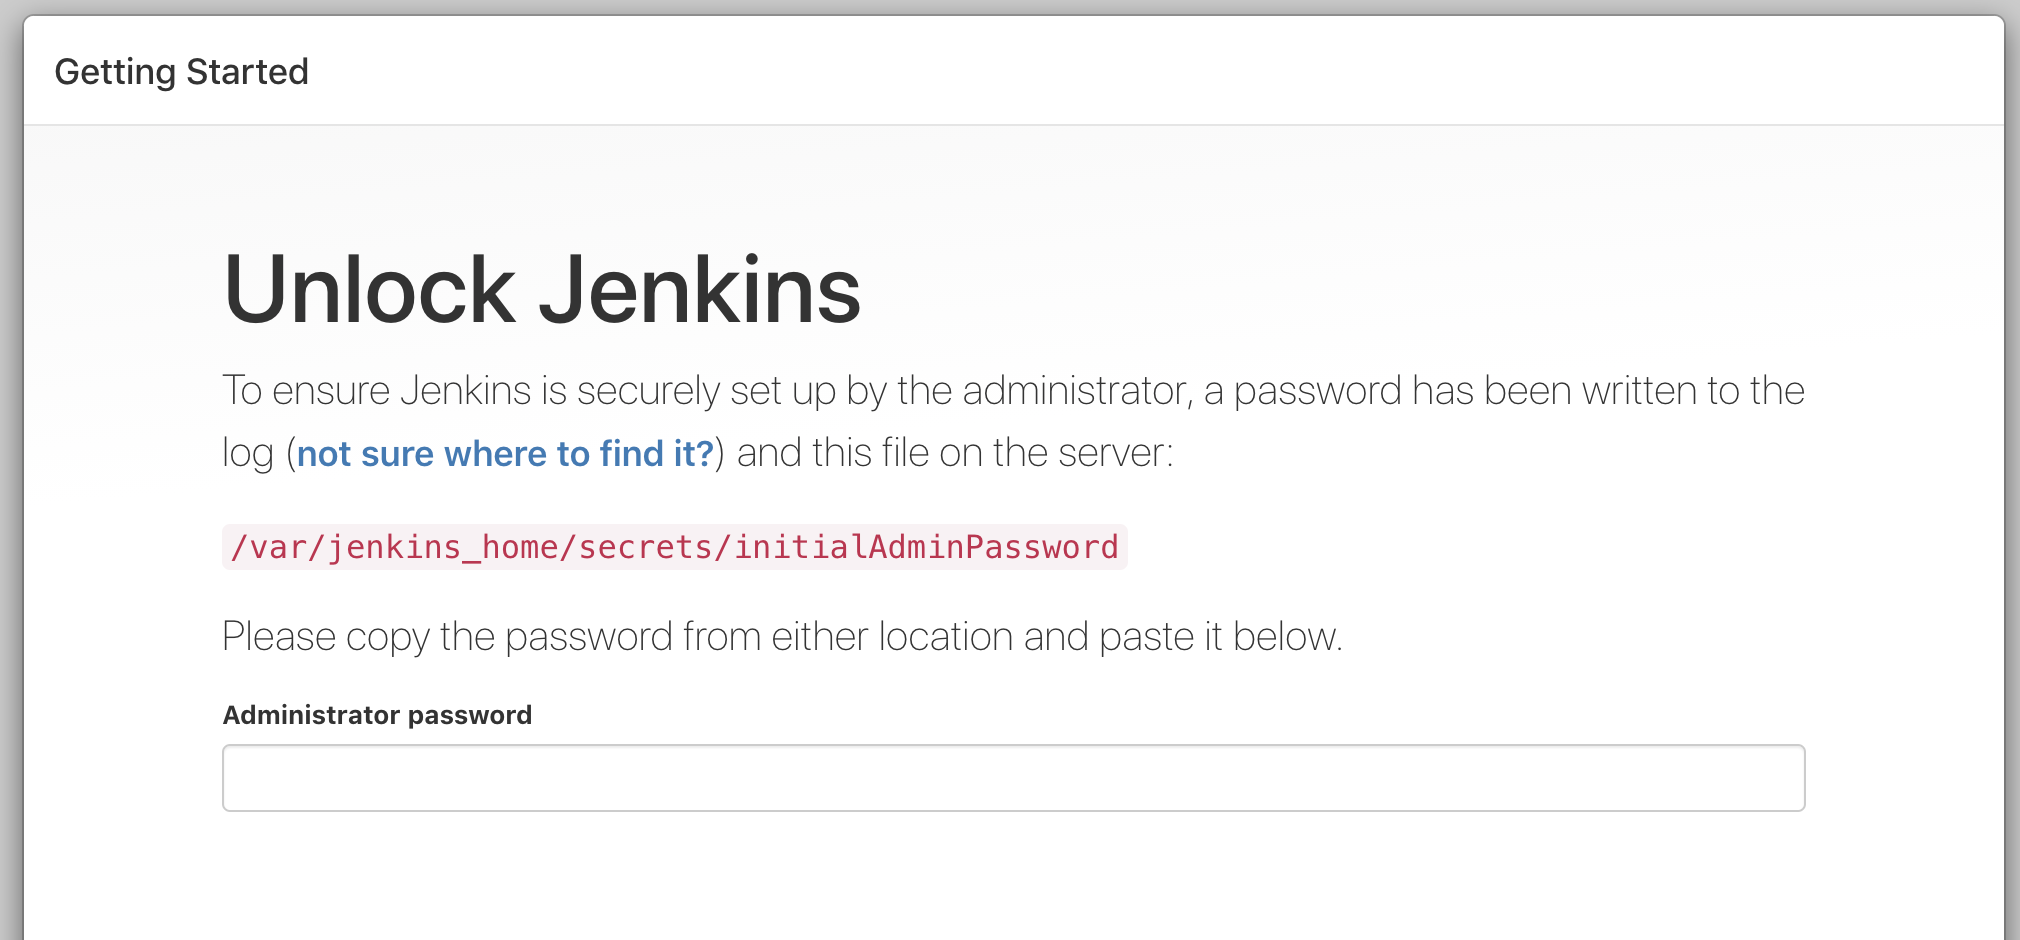
As it is explained the password can be found in the /var/jenkins_home/secrets/initialAdminPassword file or when we are running on docker we can check the logs easily with:
docker logs <container_id>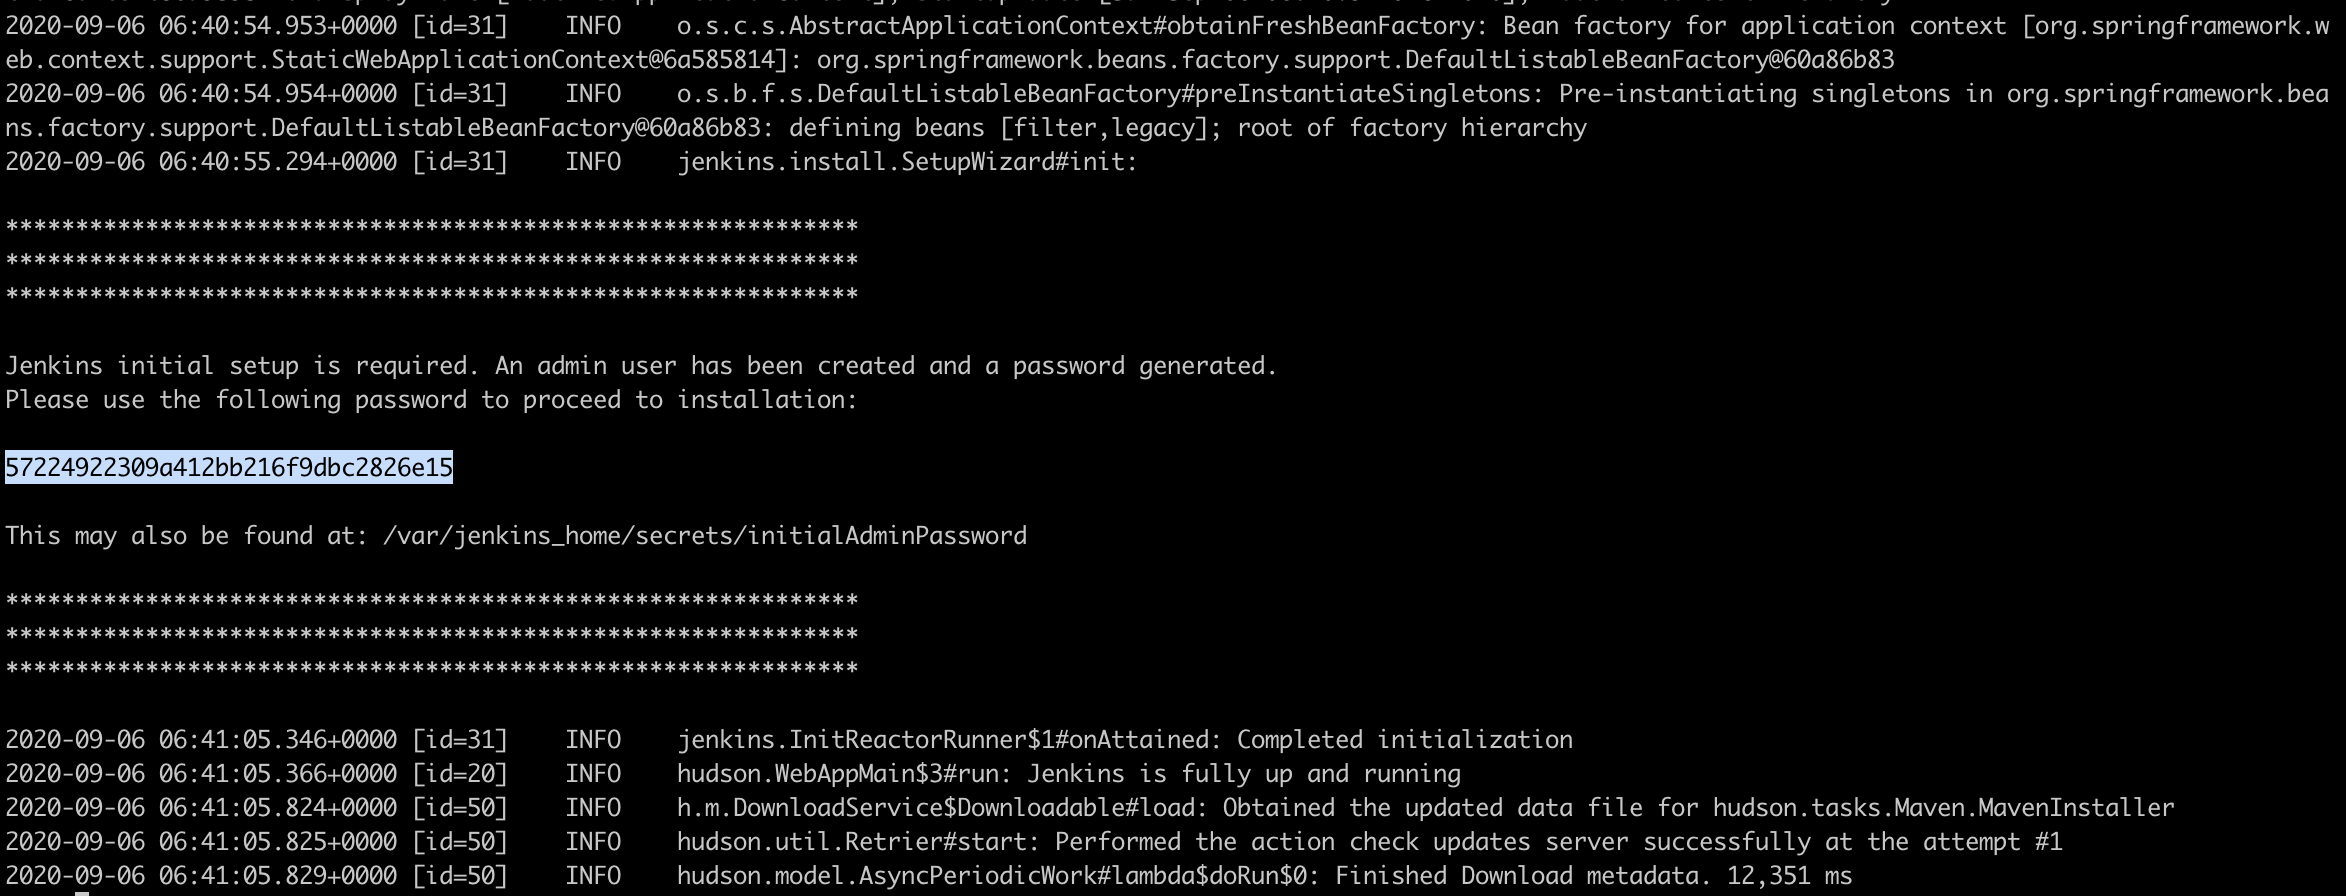
Copy the initial password and press Continue. In the next screen, we can select 'Install Suggested Plugins' to have some popular plugins set up. After plugins are installed create a new user for yourself and it will be ready to use.
Install the following plugins to integrate the pipeline with docker by going to Manage Jenkins -> Manage Plugins -> Available
- Docker
- Docker Pipeline
Bitbucket Webhooks
Now I am going to create a pipeline for one of my Spring boot projects that is on Bitbucket cloud. I would like to run the pipeline only when something is committed to the master branch. To achieve this we can use webhooks in the VCS that will hit the url when some change is pushed, and triggers in Jenkins to catch such event.
In order to use Bitbucket triggers we need to install bitbucket plugin. Go to Manage Jenkins -> Manage Plugins -> Available, search for Bitbucket and install the plugin. This plugin offers integration between Jenkins and Bitbucket. We can set up the webhook in bitbucket via Repository Settings -> Webhooks.
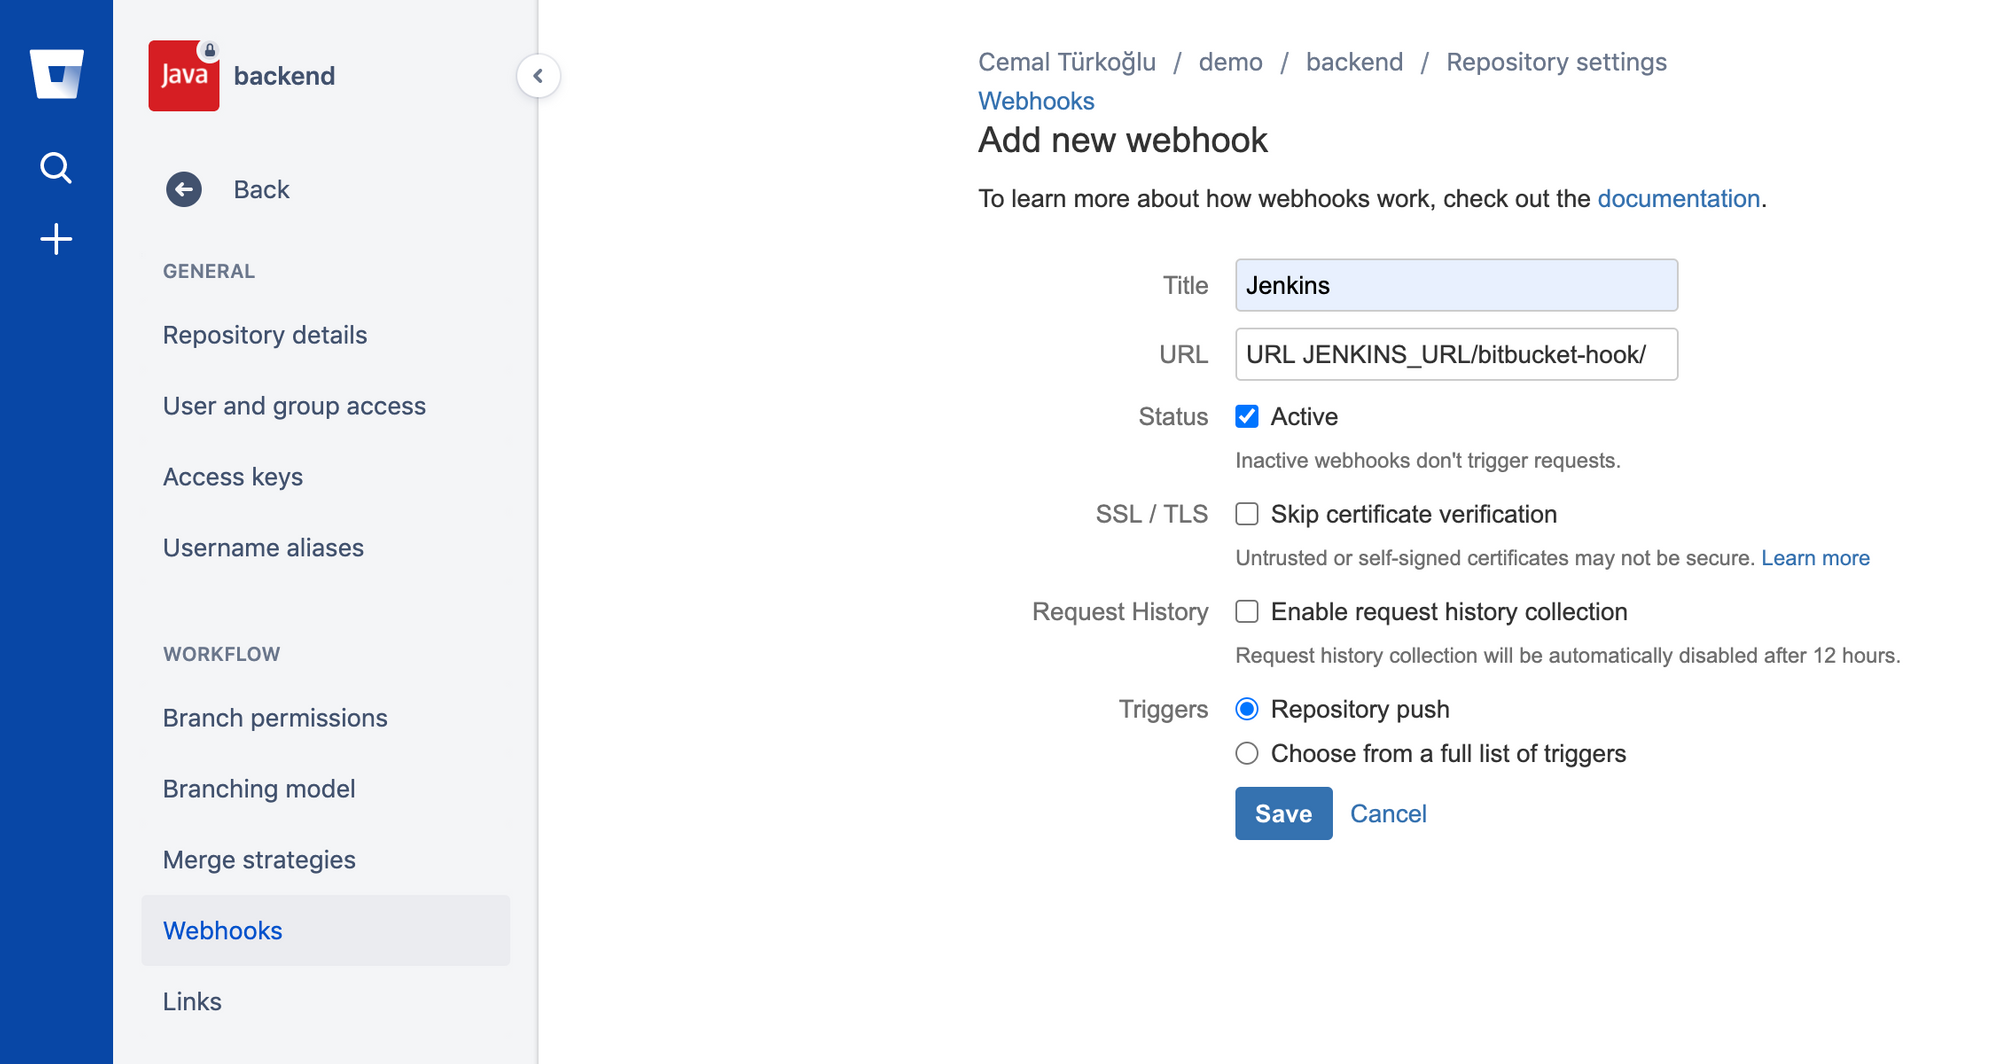
As a url we should provide the URL as http://jenkins-public-ip/bitbucket-hook/. Please note that if you are running testing it locally you should either configure port forwarding to 8080 port or you can use ngork to expose a public ip and port. After this step, bitbucket will hit the given Jenkins url anytime something is committed.
Pipeline
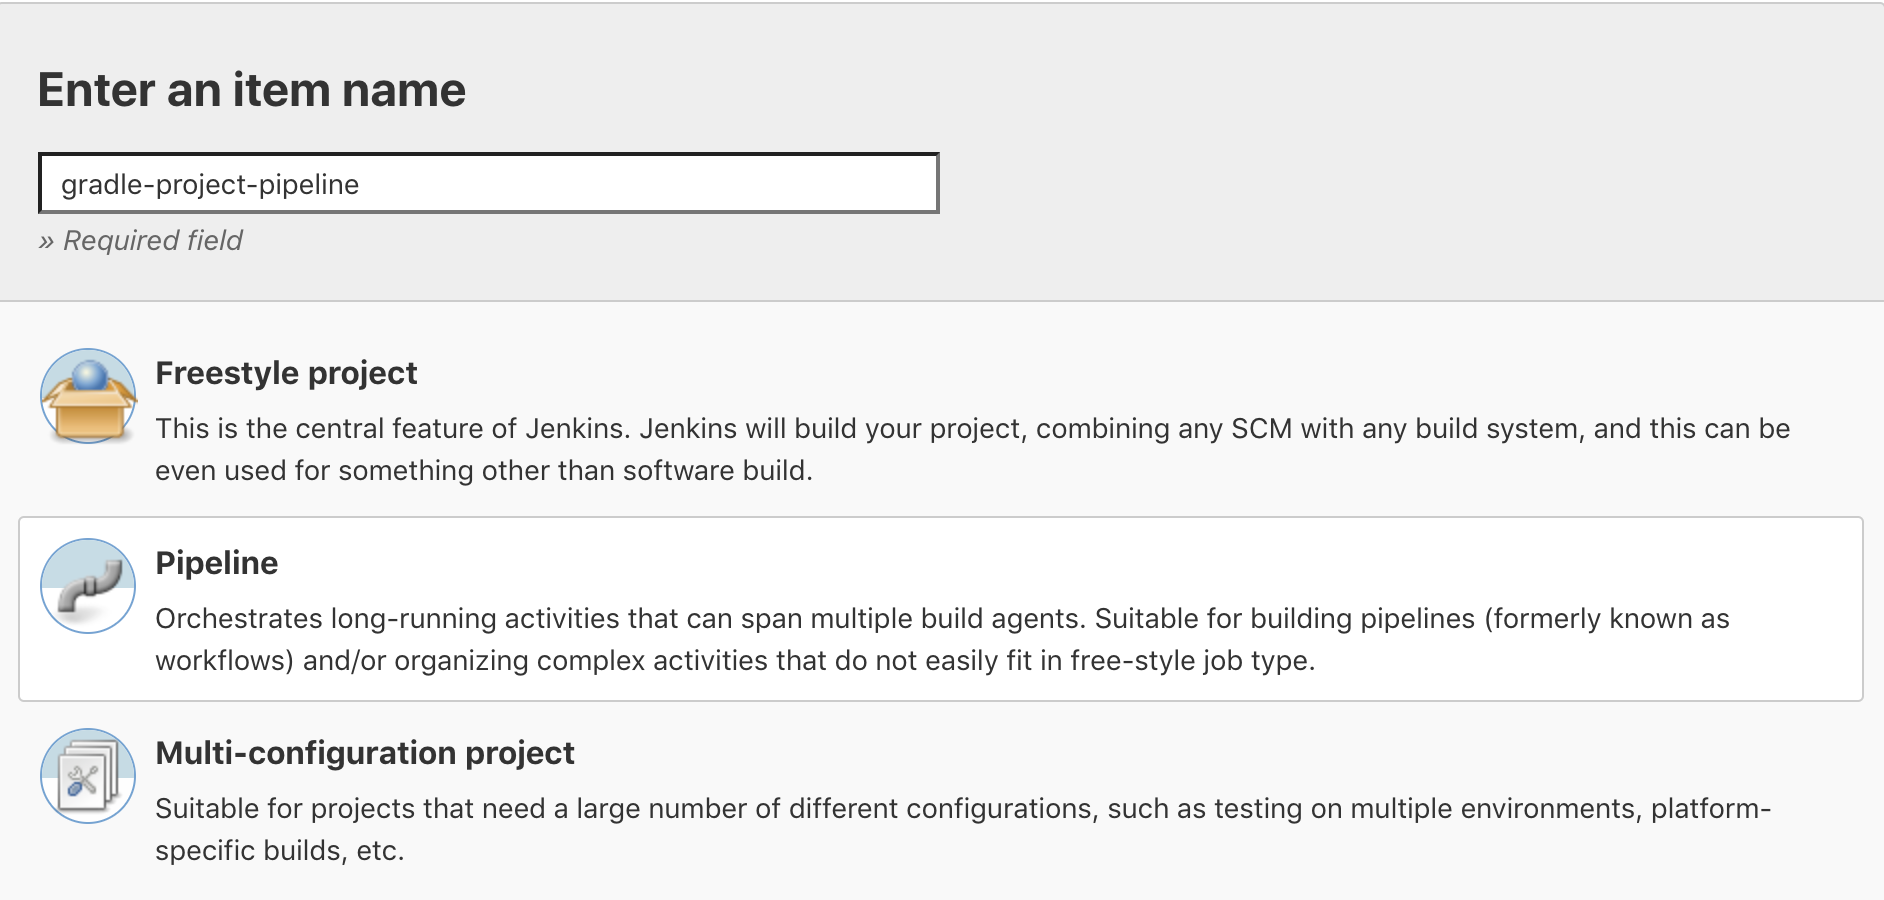
Now lets create a new project in Jenkins. With the Freestyle project we can create pipelines configured on the UI, however it is better practice to keep the pipeline as a code (Jenkinsfile) within the repository itself. This is done via Pipeline option.
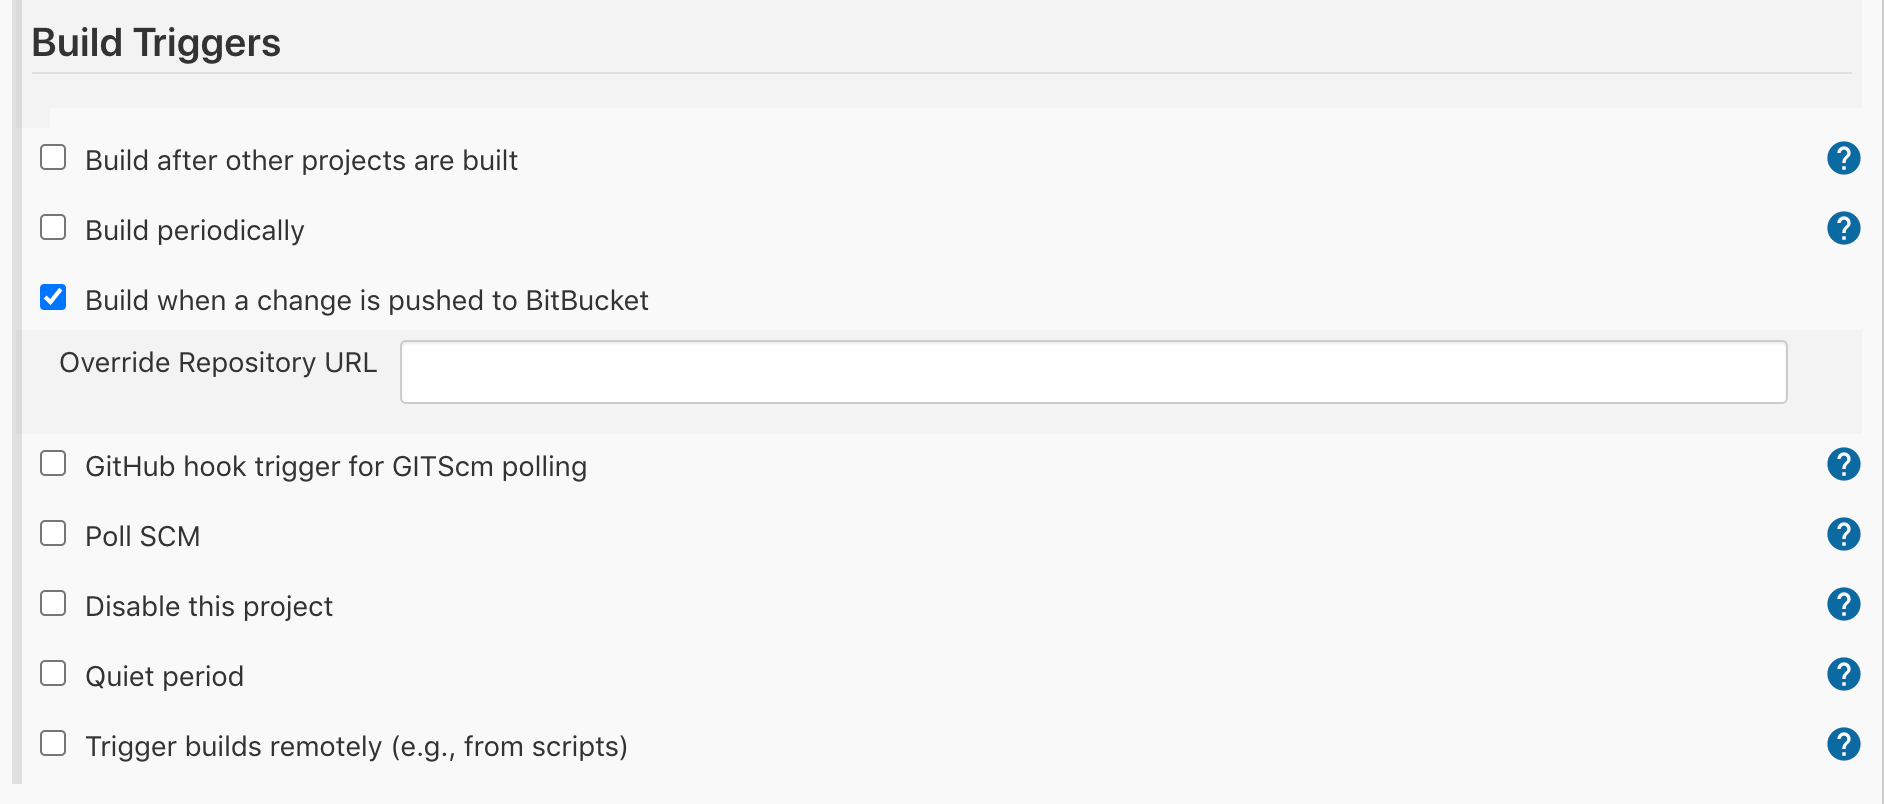
We can start configuring the pipeline with build triggers. We select the Bitbucket changes.
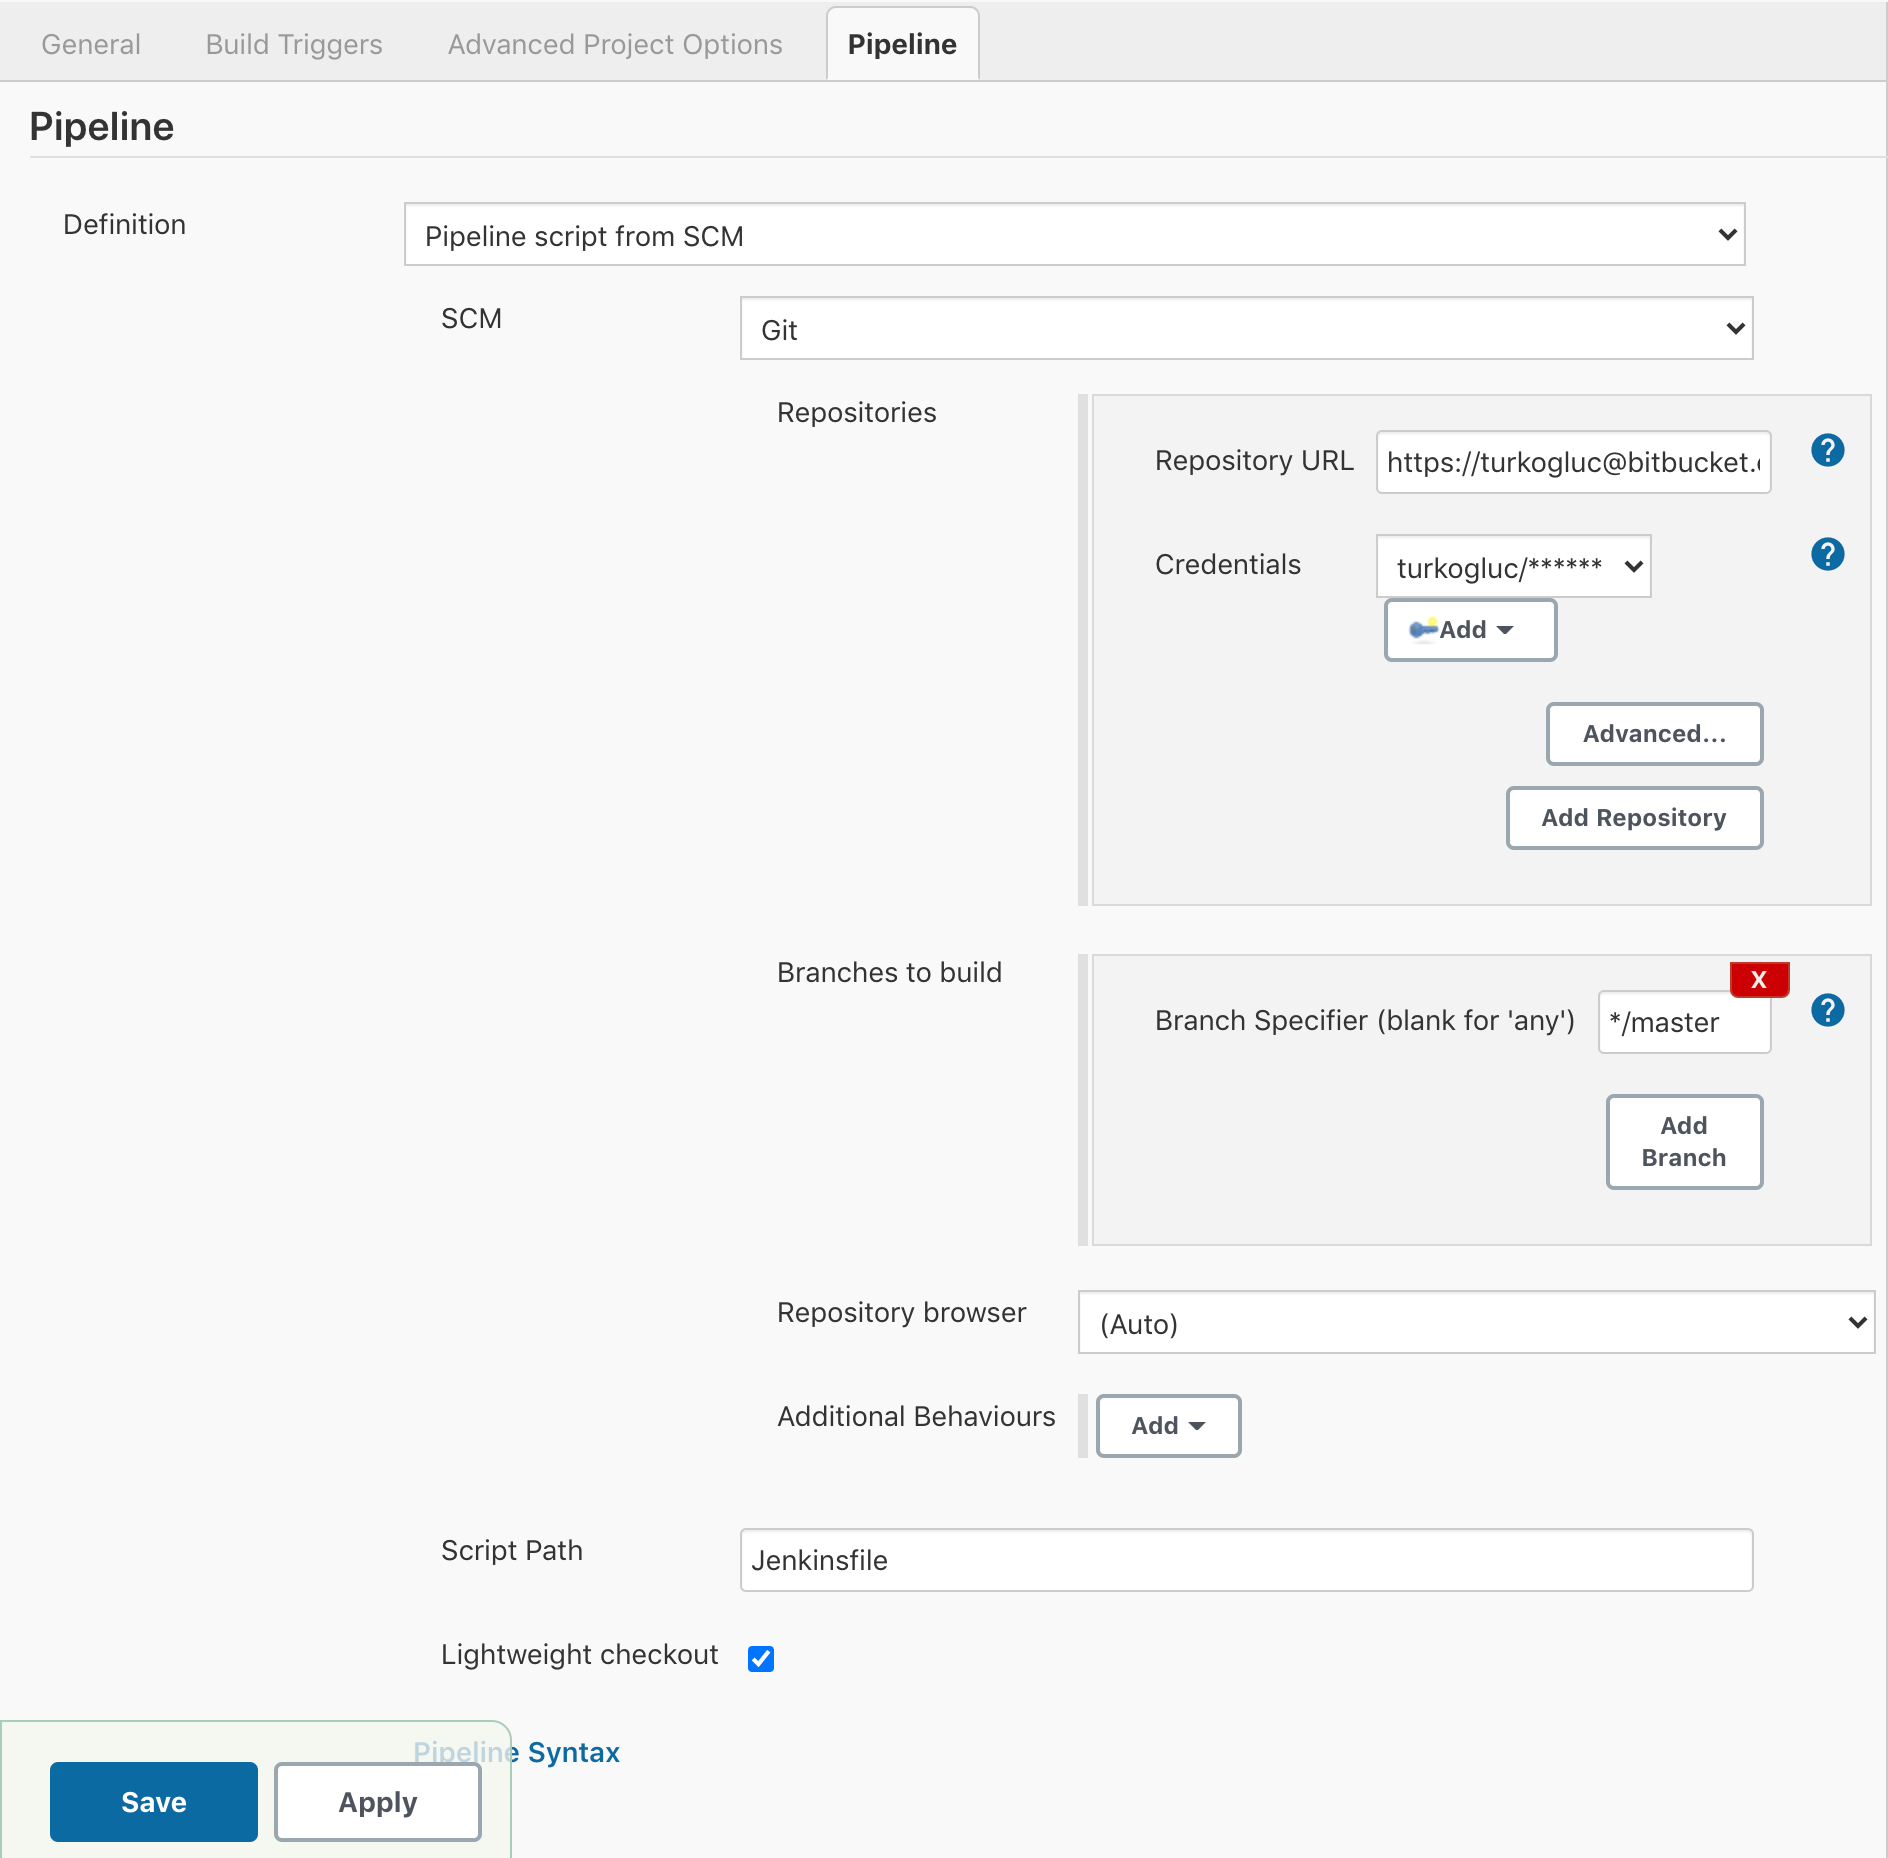
We can write the Jenkinsfile directly in the pipeline or we can use it from the repository. It is better idea to keep the pipeline code within the repo itself as it would be one source of truth and also we would not loose it if something happens to Jenkins instance. So we select Pipeline script from SCM. For this option we need to add the repository, credentials to access the repository if it is not public, and finally location of the Jenkinsfile.
Jenkinsfile
We can start writing the Jenkinsfile with the following template:
pipeline {
    agent any

    triggers{
        bitbucketPush()
    }

    stages {
		stage ("build") {
        	steps {
            	// ..
            }
        }
    }
}
Agent: is a required section and used to select the executor of the entire pipeline or specific stage. So we can define agents in pipeline level or in stage.
It can take any, none, label, node, docker. If we have a Jenkins cluster we can select the node to run the pipeline. Also, we can run the pipeline in a docker container as it is an independent node:
agent {
    docker {
        image 'openjdk:11'
        args  '-v /tmp:/tmp'
        reuseNode true
    }
}
reuseNode is used run the container in the same workspace.
Triggers: Defines the way pipeline should be triggered. As we install the bitbucket plugin we can use bitbucketPush.
Stages: Consist of stage sections which contains steps.
Stage: Test & Build Artifact
We need to simply run gradle clean build in the project directory in order to create a jar file. In Jenkins pipeline we can use gradle in different ways.
- With gradle tool managed by Jenkins. To configure:
Manange Jenkins->Global Tool Configuration->Gradle->Add Gradle - We can use gradle wrapper that is already in the repository root directory.
stage ('Build') {
	steps {
		sh './gradlew clean build'
	}
 }
3. We can build the project within a JDK docker container.
stage ('Test and Build') {
    agent {
        docker {
            image 'openjdk:11'
            args '-v "$PWD":/app'
            reuseNode true
        }
    }
    steps {
        sh './gradlew clean build'
    }
}
In this example we run the steps in the container agent based on openjdk:11 image. If we are running the Jenkins on docker this can be helpful because docker image has java version 8 and because of oracle license it is not possible to upgrade above java 9. So we can build the project by using openjdk container.
Stage: Build & Publish Docker Image
We can use directly sh command to run docker build.
stage ('Build docker image') {
    steps {
        sh 'docker build -t turkogluc/spring-jenkins-demo .'
    }
}
In order to publish the docker image we can use the following:
steps {
    withDockerRegistry(credentialsId: '9b38192f-91c0-4789-ac24-85baabb4e094', url: 'https://index.docker.io/v1/') {
        sh 'docker push turkogluc/spring-jenkins-demo'
    }
}credentialsId: Id of the credentials created on Jenkins to login docker registery ( Manage Jenkins -> Manage Creadentials )
url: Url for docker registery. (dockerhub: https://index.docker.io/v1/)
Stage: Deploy
If we are going to deploy the image in the same server we can easily call docker run.
stage ('Deploy') {
    steps {
        sh 'docker run -d -p 8080:8080 turkogluc/spring-jenkins-demo'
    }
}
Should you deploy it to another server, it can be done by ssh, for example:
stage ('Deploy image to remote server') {
    steps {
        withCredentials([sshUserPrivateKey(credentialsId: 'instance-1', keyFileVariable: 'KEY_FILE', usernameVariable: 'USER')]) {
            sh 'ssh -i ${KEY_FILE} ${USER}@${REMOTE_ADDRESS} "docker run -d turkogluc/spring-jenkins-demo"'
        }
    }
}
So the overall Jenkinsfile can be seen as follows
pipeline {
    agent any

    triggers{
        bitbucketPush()
    }

    environment {
        REMOTE_ADDRESS = "REPLACE_WITH_REMOTE_ADDRESS"
    }

    stages {
        stage ('Test & Build Artifact') {
            agent {
                docker {
                    image 'openjdk:11'
                    args '-v "$PWD":/app'
                    reuseNode true
                }
            }
            steps {
                sh './gradlew clean build'
            }
        }
        stage ('Build & Push docker image') {
            steps {
                withDockerRegistry(credentialsId: '9b38192f-91c0-4789-ac24-85baabb4e094', url: 'https://index.docker.io/v1/') {
                    sh 'docker push turkogluc/spring-jenkins-demo'
                }
            }
        }
        stage ('Deploy image to remote server') {
            steps {
                withCredentials([sshUserPrivateKey(credentialsId: 'instance-1', keyFileVariable: 'KEY_FILE', usernameVariable: 'USER')]) {
                    sh 'ssh -i ${KEY_FILE} ${USER}@${REMOTE_ADDRESS} "docker run -d turkogluc/spring-jenkins-demo"'
                }
            }
        }
    }
}